

Cecilia's Country Pie Crust Pastry
A pie needs a good pie crust - a good shell to hold all its deliciousness. I wanted a pastry that supports, not only an Apple Pie or Pumpkin Pie, but a vegetarian Quiche or my favorite Steak and Onion Pie (below). I wanted it to be melt-in-your-mouth light, with the sweet taste of winter wheat complementing the filling I chose.

Enter my Mum. My mother was not much of a bread maker (though as kids all we knew were her dark heavy breads so we loved her bread anyway), but she did make a mean pastry for the family pies. And like all the best recipes this is so simple you don’t have to write it down.
Here is my Mum’s formula: FOUR. TWO. ONE. It is that easy! 4/2/1 Simple right?
If you keep that simple equation in your head, you have your pastry recipe for one or ten pies. Four is the flour. Two is the fat (butter or lard - I choose butter) and ONE is the water. Then a pinch of salt, maybe even a little sugar.
-
For my recipe today that equates to 2 cups of flour, 1 cup of butter and 1/2 a cup of water. (And a pinch of salt).
For such a simple dough it is imperative to use the best ingredients. Good flour (obviously), high-fat unsalted cold butter (I love that Irish butter), clean clear iced water and your favorite salt. The salt brings out the sweetness of the dough and complements the sweetness of your filling, I don’t add sugar to my crust preferring to allow the sweetness of the filling to dominate the palate: layering the taste profile. But feel free to add a little sugar yourself, I won’t tell!
For Mum’s Country Pastry I blended the Janie’s Mill All Purpose flour (Warthog Wheat - a Hard Red Winter Wheat) with our Janie’s Mill Silky Smooth Pastry Flour (Erisman wheat-a Soft Red Winter Wheat). This combines the flaky delicate lightness of the Erisman with the extensibility and sturdiness of the Warthog. This blend of flours gives you a stable, manageable, delicious, lightly scented pie crust that crunches and crackles with each bite.
Cecilia’s Mum's Country Pie Crust
Ingredients
- 1 cup (110g) Janie’s Mill Silky Smooth Pastry Flour
- 1 cup (125g) Janie’s Mill All Purpose Flour
- At least ¼ cup flour of bench flour
- 2 sticks -1 cup (226 grams) of very cold butter
- 1/2 cup (113g) of iced water - you may need a little more or less.
- Pinch of salt
- 1 tablespoon of sugar (optional)
Instructions
Cube butter into roughly ¼ inch pieces and place in freezer for 20 - 30 minutes.
Sift or whisk the flours, salt and sugar (if using) together.

Add the extra cold butter to the flour and roughly chop the butter into the flour using a pastry cutter, two knives or your hands. Work swiftly – do not let that butter warm up.
Make a rough well and add ice-cold water and mix together with a spatula or cold spoon until a shaggy unkempt dough forms.

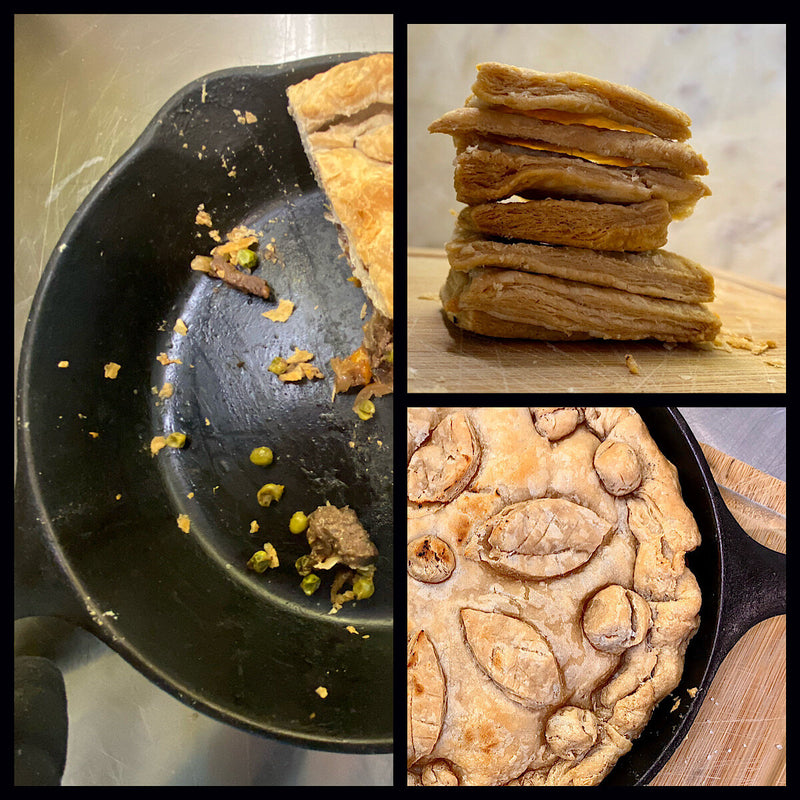
Do not over-mix. Little pieces of butter should still be visible. (Like in the center panel below) Gather the dough together with your hand, roll it around the bowl, quickly knead together then press into a ball. Wrap in plastic wrap and allow to rest in the refrigerator for one hour or more.
(As an aside: that green spoon in the middle of the center panel is my bright green mini spatula. Not a lettuce leaf! I love my mini spatulas ).

After the pastry has rested cut the pastry dough in half and return one half to the refrigerator. On a surface dusted with flour, roll half the pastry to ¼ inch thick. Roll from the middle to the outside, turning and flouring as you go to prevent the pastry from sticking to the counter. Line your greased pie dish with chilled and rolled pastry, prick with a fork, then rest in the refrigerator uncovered. Roll the second half for the top of your pie – either cut into strips or one top sheet - then rest uncovered in the refrigerator until you are ready to compile your pie. (You can choose to laminate the pastry at this point to make an extra flaky pastry. This just means creating layers of dough before rolling it thin again. Just cut your dough into smaller pieces and roll it out, laying each piece on top of the other, using bench flour to prevent sticking, then fold in half then in half again and roll it out to 1/4 inch and proceed to the pie pan. You will need to rechill your dough in the cold fridge between a couple of those moves). Be light and swift. Keep it cold.
You may choose to blind bake your pie crust at this point.
Baking times will depend on your filling so you will need to refer to your own recipe.
For the record I bake my steak and onion pie for an hour at 380F. And my apple pie: 40 minutes at 380F . Every oven is different so adjust as necessary.

Options:
-
For an apple pie: take out a little butter and replace with a sharp cheddar cheese. The cheese and apple are perfect taste companions.
-
If you have left over pastry roll it out and sprinkle with your favourite cheese and pepper. Cut into wide strips and hand out warm from the oven to your favorite children.
-
The pastry baked on its own in squares makes a fantastic snack!
Here are a few important tips:
-
Tip One. When you decide to make pastry chop the butter up into tiny pieces and put it in the freezer to get it very, very, very cold. This is your first step.
-
Tip Two. Prepare everything ahead of time. Chill the butter, put an ice-cube in the measured water, have your cold utensils to hand and your flour measured. Make sure you have space in the refrigerator for resting the dough, etc. In French this laying-out ahead of time is called ‘mise en place’. Getting everything measured and in it’s place: ready to go before you begin. It is a really good habit to get into, especially when you are making pastry.
-
Tip Three. Sift or whisk the flour - when you add a fat to a flour it adheres better if the flour is separated, light and fluffy. Also the whisking will blend your flours properly.
-
Tip Four. Never let your dough warm up - ever. The butter needs to stay hard to hold it’s shape right up until it goes into the hot oven. Then those hard little nuggets of butter burst up within the layers of the pastry creating that light flakiness. So, if the phone rings or you are called away pop your mixture back into the fridge to wait. Never let that butter go warm and soft. When you begin to roll out your dough do it a portion at a time so only one piece of dough is out of the chiller at one time. For this recipe you can use your flour straight from the ‘fridge.
-
Tip Five. When you add your water and stir it up and the dough looks like a horrible mess you have it exactly right. You want to see little chunks of butter in there. Grab a handful and squeeze gently - if the dough holds its shape then you have enough water. Do not over-stir. When you are done push your dough into a ball, roll it around a bit to sop up the stray dry bits of dough and wrap it up for a rest in the refrigerator. It will relax and bond during it’s cold rest period.
-
Tip Six. To transport the pastry in one piece. Roll the pastry around the rolling pin and then unroll on top of the greased pie pan. Gently adjust and press into the pan.
BONUS RECIPE!
Now, I know many of you love a cookie pie crust for a sweet dessert for example the graham crackers pie crust. Anyway you don’t have to use graham crackers. Any nice plain cookies will do. Here is what I do. I bake some sugar cookies made with All Purpose or one of the Frederick Flours. Cool the cookies. Wrap them in a T Towel and using a rolling pin, roughly pulverise them, measure 1 1/2 cups of chunky crumbs into a bowl, add 7-8 tablespoons of melted butter and combine. Use your fingers. Once again grab a handful of the mixture, squeeze and if it keeps it’s shape when you release it then the mixture is perfect, otherwise add more melted butter. While the pie base is still warm press it really firmly into your pie tin. I use the flat bottom of my 1/2 cup measuring cup (see second image) to press it into the dish and right up the sides. Get it firmly pressed down. This is important.
Then either chill it for a cold filling or proceed with your recipe. This is the base I use for my Mum’s Lemon Meringue Pie.
Posted on October 18 2020