


Skàld Bakery's Cardamom Buns
This recipe was generously shared with us by Skáld Bakery in St.Louis, MO. Skáld uses 100% Janie's Mill products in their Scandinavian-inspired bakery with Midwestern flair. Their take on the classic cardamom bun incorporates a scald for increased shelf life, a sourdough preferment for more complex flavor, and lots of butter and cardamom. The time and patience put into making these buns can certainly be tasted in the finished product - as can the creative use of so many different Janie's Mill flours!
Yield: 18 buns
Total Time: 3-4 days
Day 1: 15 minutes
Day 2: 2-3 hours
Day 3: 30 minutes
Day 4: 3.5 hours
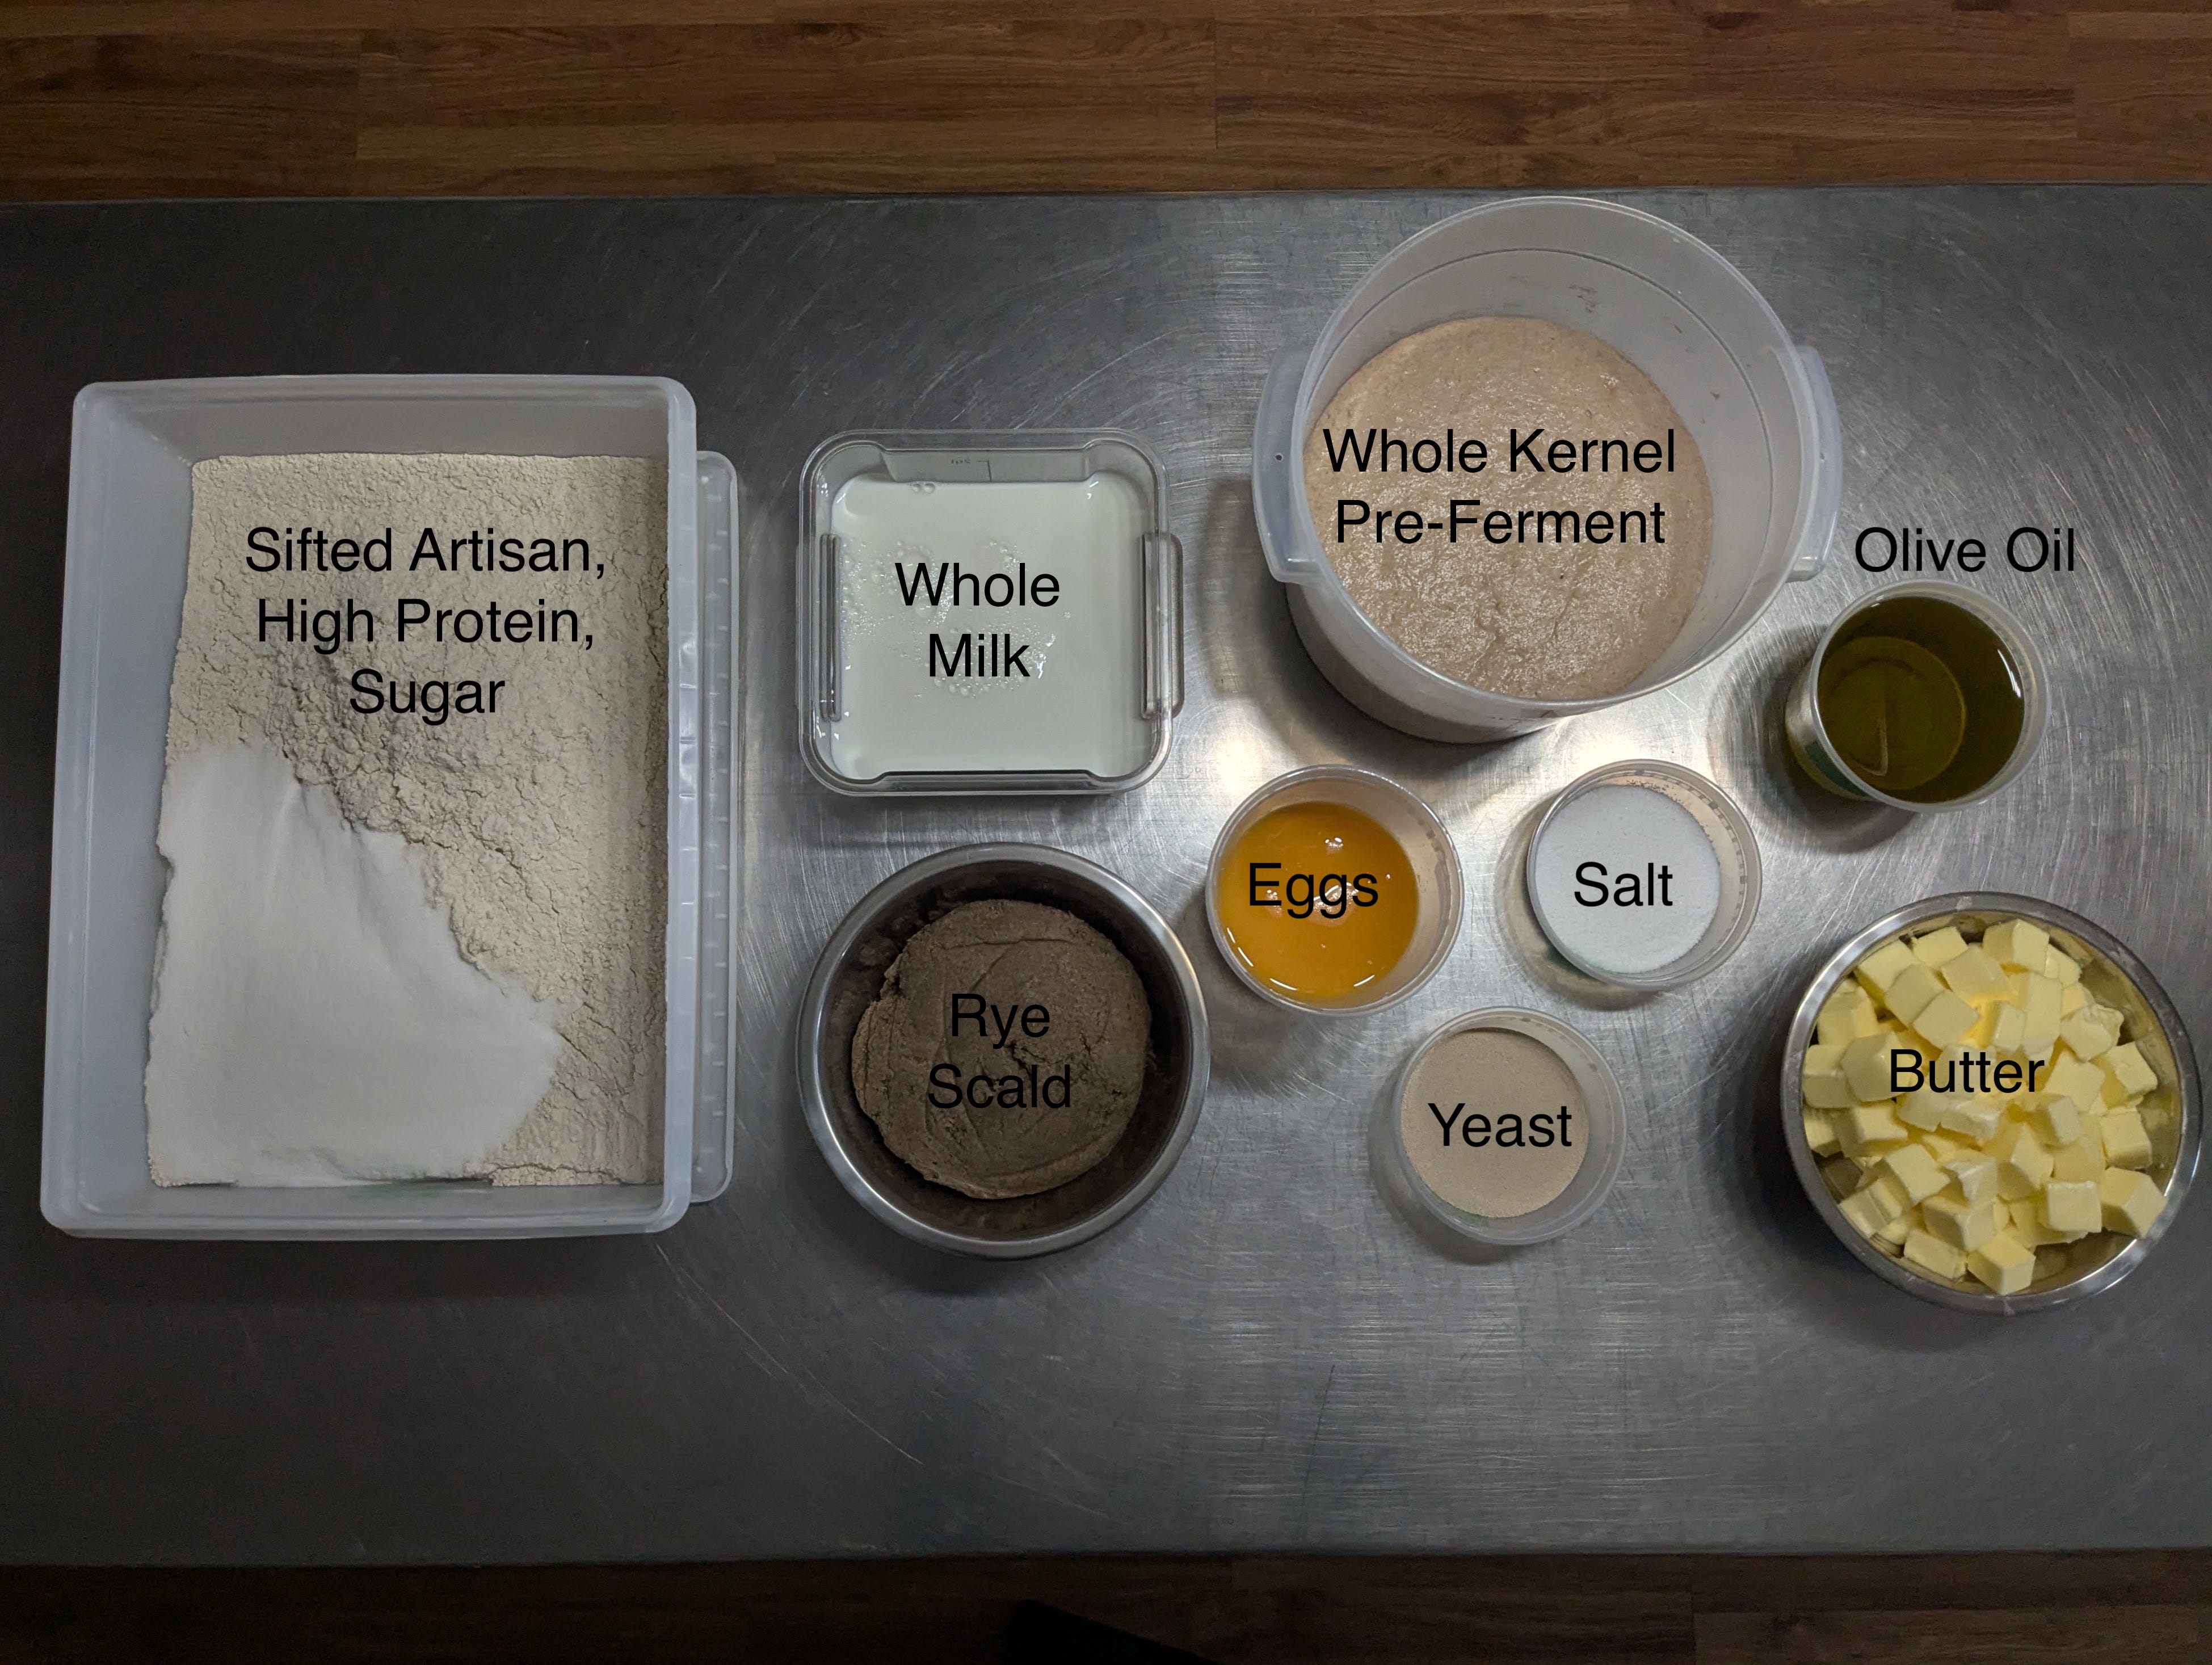
Ingredients
Dough Formula:
- 382 g Janie's Mill Sifted Artisan Bread Flour
- 367 g Janie's Mill High-Protein Bread Flour
- You may use all Sifted Artisan or High-Protein for this recipe if you don't have both on hand!
- 105 g granulated sugar
- 94 g rye scald (recipe below)
- 232 g sourdough preferment (recipe below)
- 278 g milk
- 126 g eggs
- 15 g salt
- 7 g instant yeast
- 196 g softened butter
- 97 g olive oil
For the rye scald:
- 60 g Janie's Mill Dark Rye Flour (Whole-Kernel may be used as a substitute)
- 90 g boiling water
For the Whole-Kernel Preferment:
- 146 g Janie's Mill Whole Kernel Bread Flour
- 146 g water
- 73 g active sourdough starter
Cardamom sugar:
- 279 g granulated sugar
- 18 g cardamom (ground or blended)
- 3 g salt
Cardamom schmear:
- 233 g softened butter
- 117 g cardamom sugar (see recipe above)
Cardamom syrup:
- 143 g cardamom sugar (see recipe above)
- 57 g water
Instructions
Day 1: Preparation (active time: 15 minutes)
-
Prepare the cardamom sugar. Refer to the Cardamom Sugar recipe for your measurements. Blend the whole green cardamom pods in a spice grinder or blender, before whisking them together with the sugar and salt. You will be using this cardamom sugar to make your cardamom schmear, cardamom syrup, and to fill the buns.
-
Feed your sourdough starter ~14 hours before you plan on mixing the dough. You will need at least 75 grams of active starter to feed your preferment the morning of the mix, so plan accordingly. Feed your sourdough starter with equal parts flour and water. Leave your starter on the counter-top overnight to ensure that it becomes active enough.
-
Mix your Rye Scald. Refer to the Rye Scald recipe for measurements. Bring the water to a rapid boil, either in the microwave or on the stovetop. Quickly add the piping hot water to the flour all at once and mix together. The result should be a soft and sticky paste of gelatinized flour. Cover and store in the refrigerator overnight.
-
Set out all of the softened butter you’ll be needing for tomorrow. Refer to the Cardamom Schmear, and Dough Formula recipes to determine the total amount of butter. It will be helpful to place the butter for each recipe into its own container. At the bakery, we chop the butter for the dough formula while it is still cold, before storing it in a bowl. This will make things slightly less messy for you tomorrow. Place the butter for the schmear in a separate bowl with the cardamom sugar from the same recipe.
Day 2: The Mix (active time: 2-3 hrs.)
-
Start the day by feeding a new pre-ferment with your active sourdough that was fed the day before. Use room temperature water. Refer to the Whole-Kernel Pre-ferment recipe for measurements and to ensure you have enough leftover starter. “Seed Pre-ferment” in the recipe refers to your active sourdough starter.
-
While you wait for your newly fed pre-ferment to become active, or to roughly double in size, scale the remaining ingredients into adequate containers. Refer to the Dough Formula recipe for measurements.
-
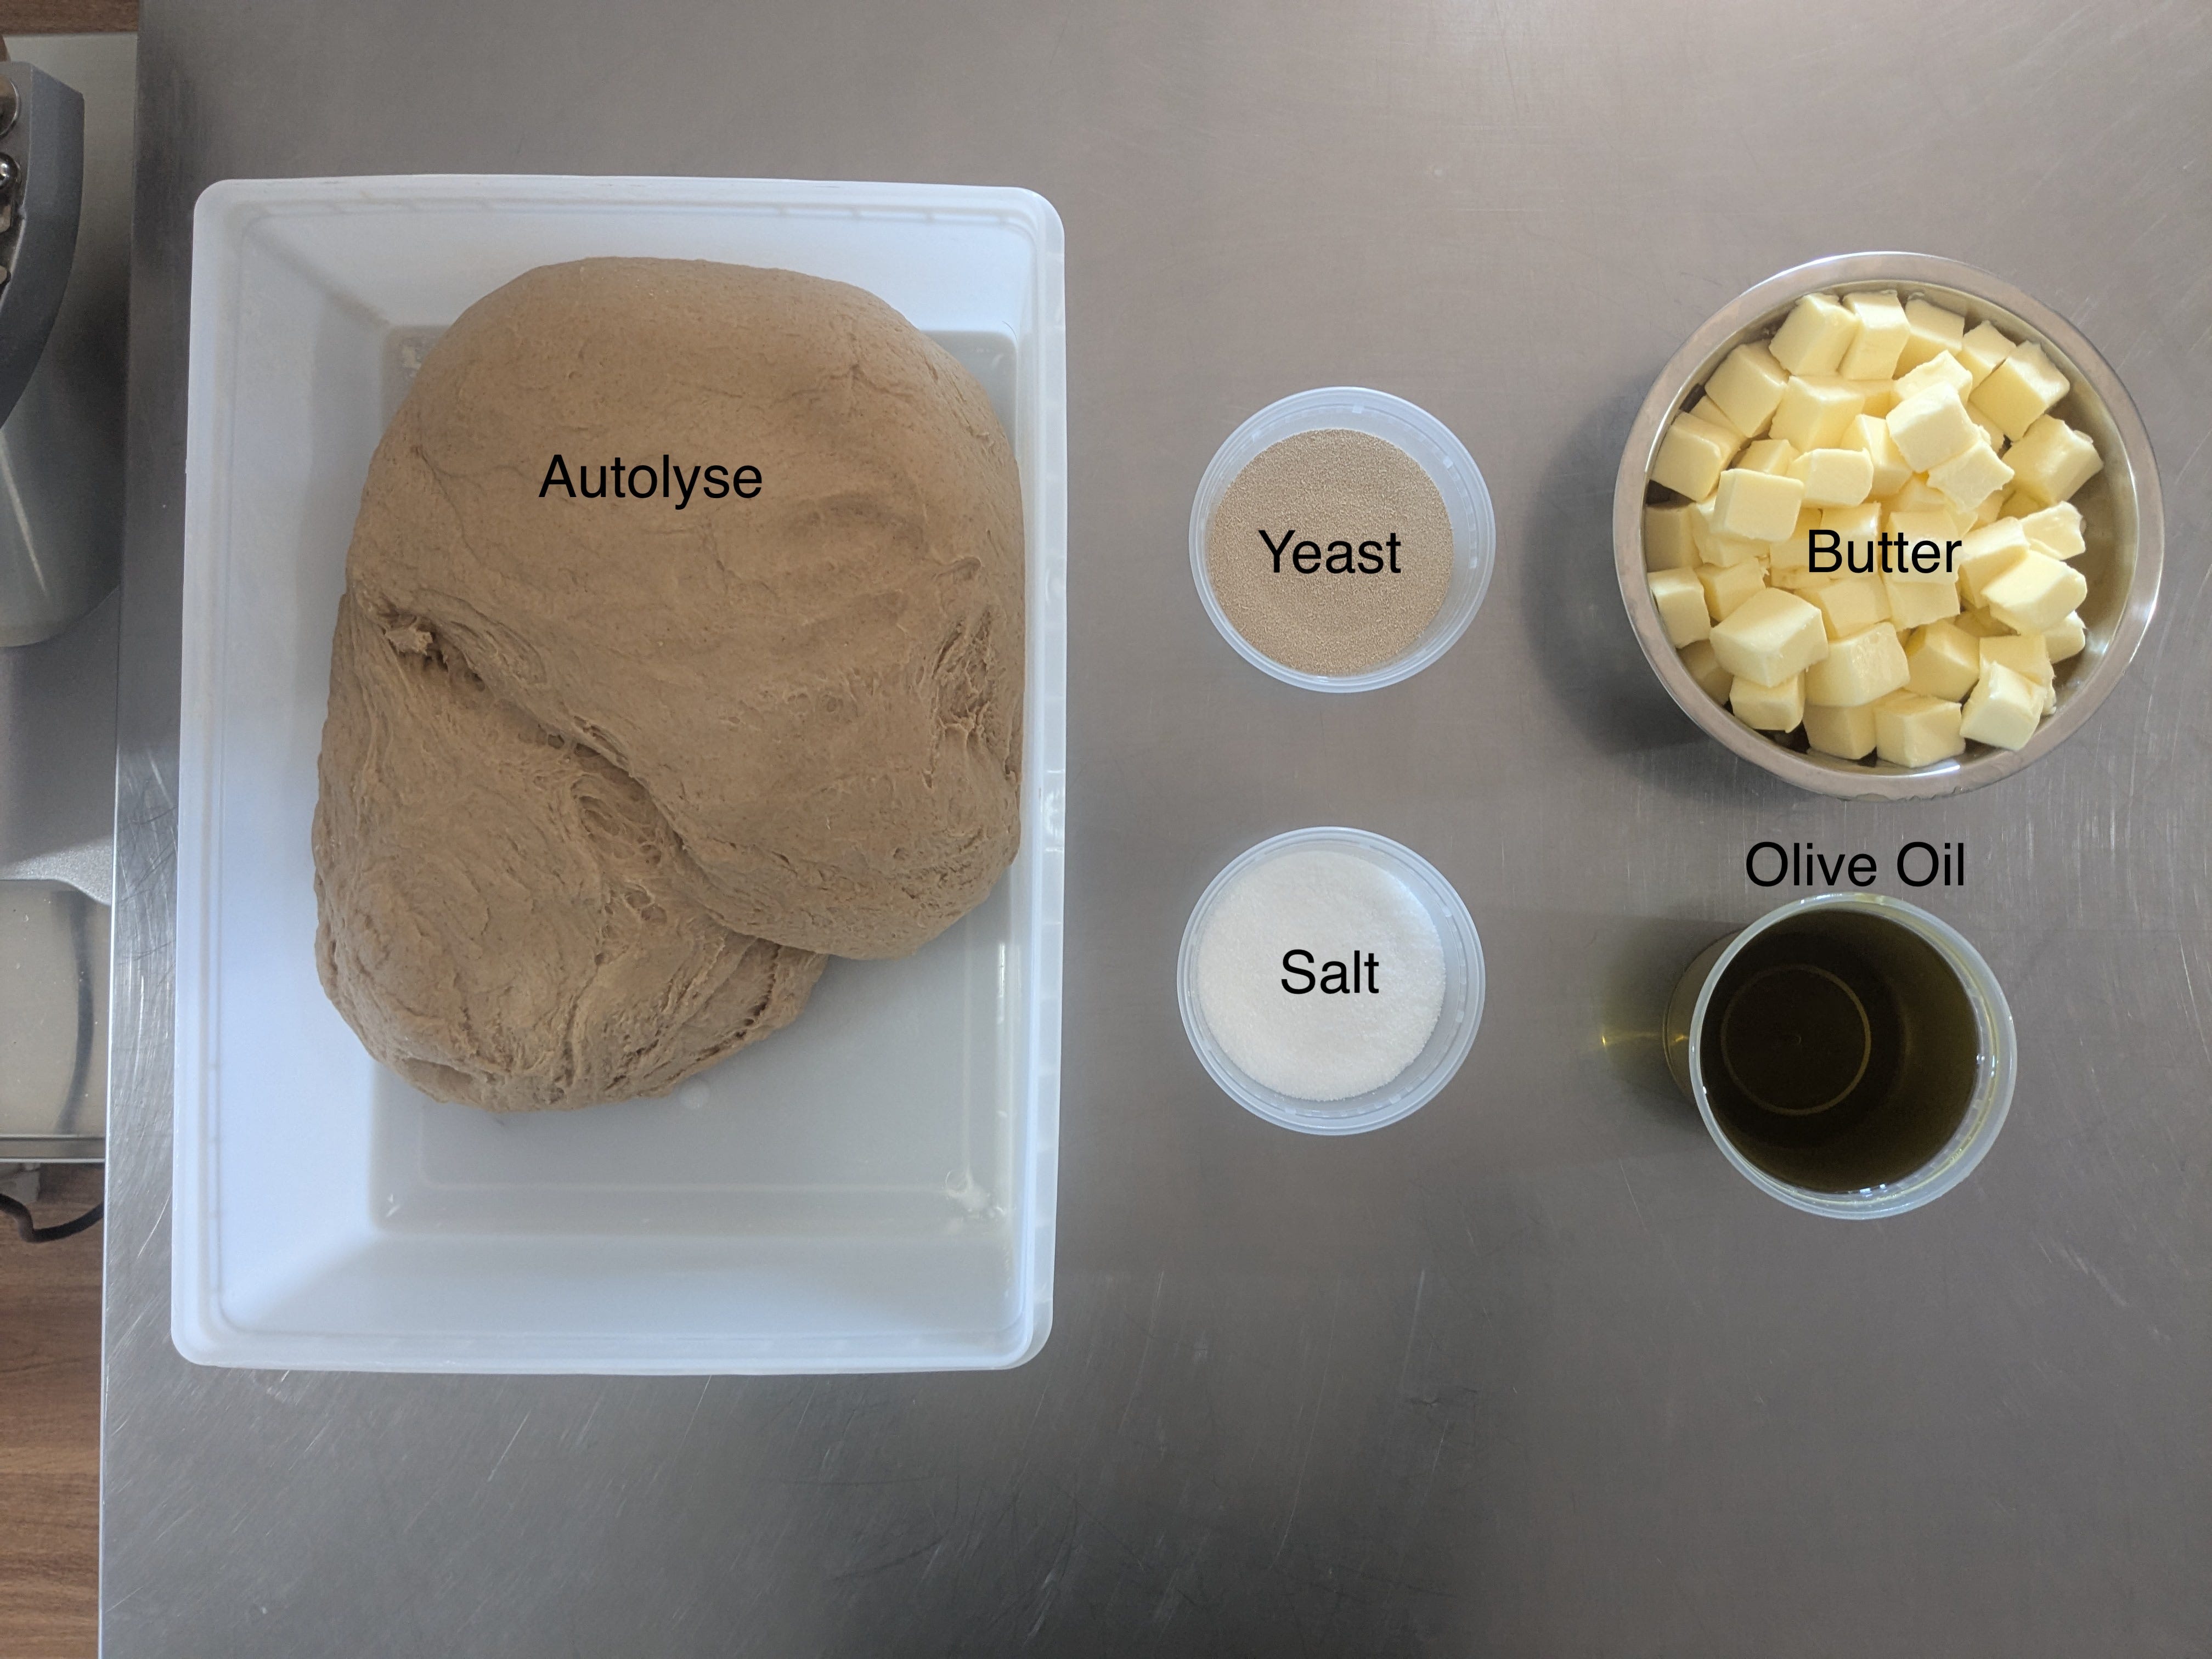
When you see that your Whole Kernel Pre-Ferment has become active, or doubled in size (this could take anywhere from 2 - 4 hours,) you can begin the mix. Add to your stand mixer bowl the Whole Milk, Eggs, Rye Scald, and Whole Kernel Pre-Ferment (only the amount you need from the Dough Formula recipe, reserve the remaining preferment for a fresh sourdough feeding.) Use your hands to break up the Rye Scald into smaller chunks. Add the Sifted Artisan Flour, High Protein Flour, and Sugar to the bowl. Using a dough hook, mix these together until a homogenous dough has formed. Cover the bowl and let the newly formed dough rest for at least 30 minutes. This is the autolyse phase of the mix.
-
After your autolyse has rested, it will be time to mix in the salt and yeast. Add the salt to the bottom of the mixing bowl beneath the dough, and the yeast to the top of the dough, so that neither are touching. Mix in the salt and yeast, again with the dough hook attachment. Once you can see that the salt and yeast have dissolved into the dough, rest the dough for another 15 minutes.
-
After the 15 minute rest it will be time to add the butter. Set the mixer speed at low and begin to slowly add the butter ~1 golf ball sized chunk at a time. Take care to add the butter slowly, not adding the next piece until the previous piece has been adequately mixed in. Once all of the butter has been incorporated, rest the dough again for another 15 minutes.
-
After the 15 minutes is up, it’s time to add the oil. Set the mixer speed to low and begin to slowly stream in the oil. Take periodic breaks from streaming in the oil in order to give the dough the time it needs to mop it all up. Once all of the oil has been mixed into the dough, let the dough rest for another 15 minutes.
-
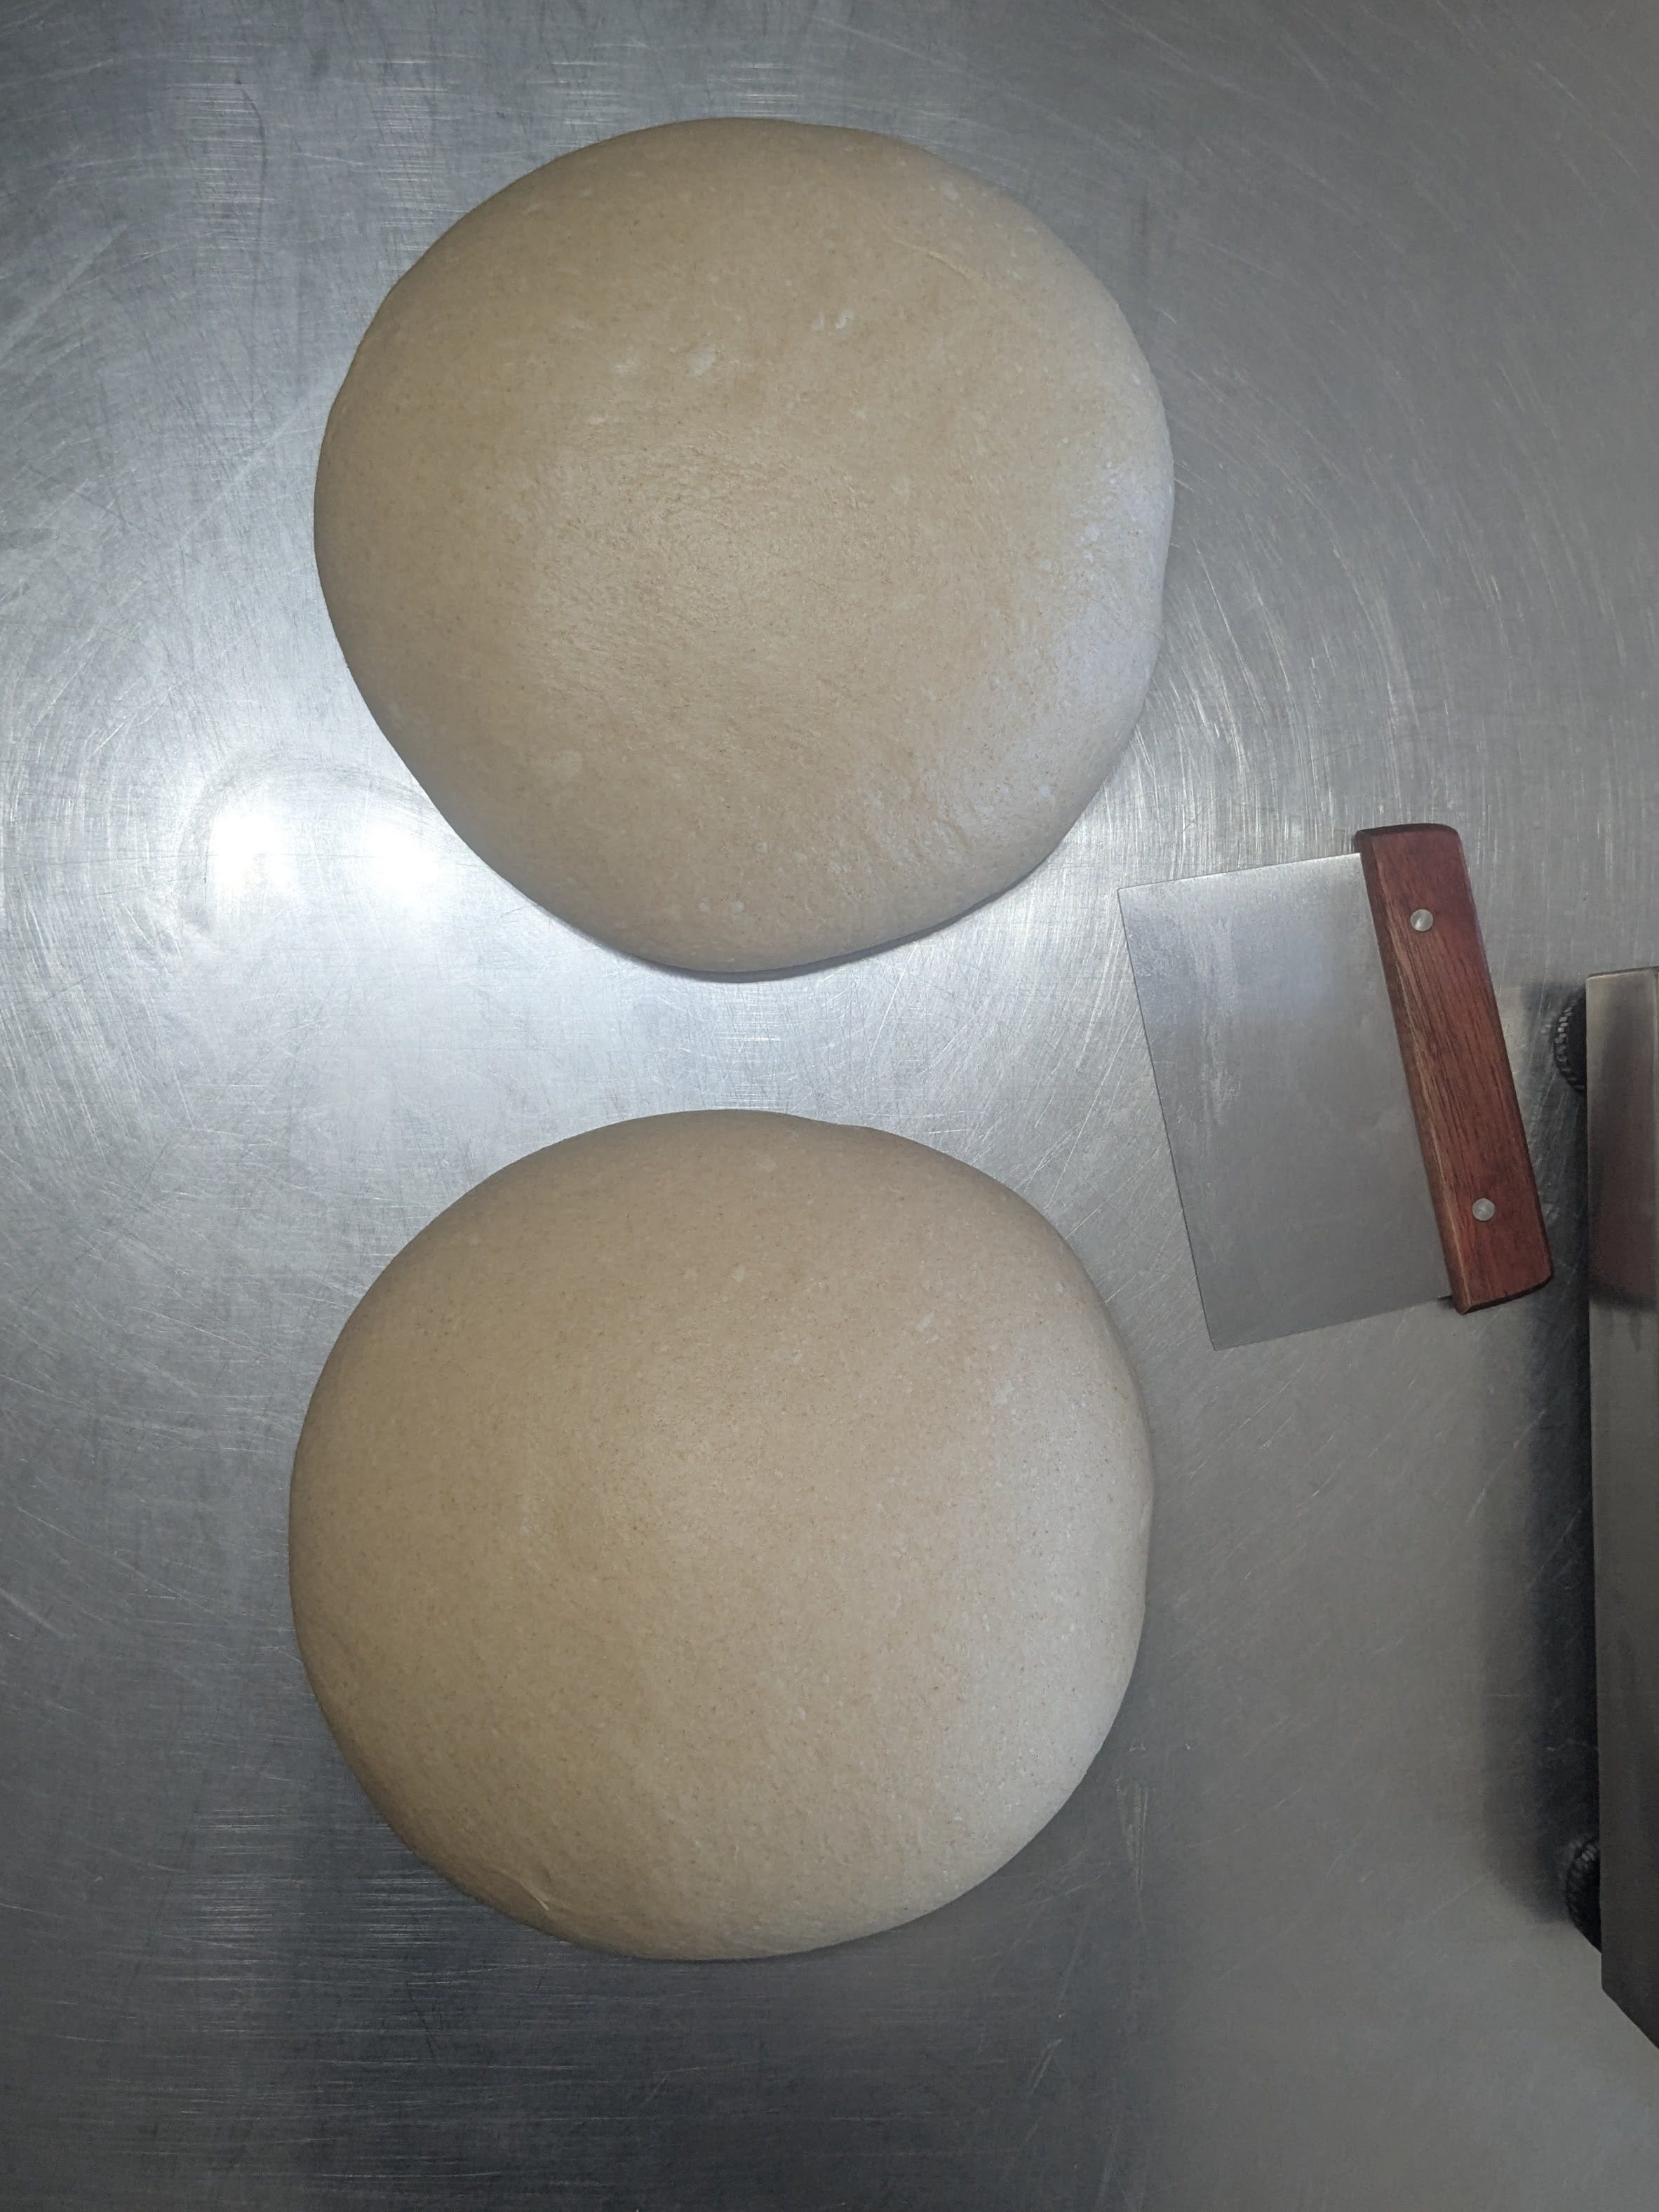
Turn the dough out onto a floured or unfloured (the choice is yours) work surface. Pictured above you might notice that there are 2 rounds instead of 1. You are reading a recipe for only one! Shape the dough into a single round using either your hands or a bench knife, and let it rest for another 10 minutes.
-
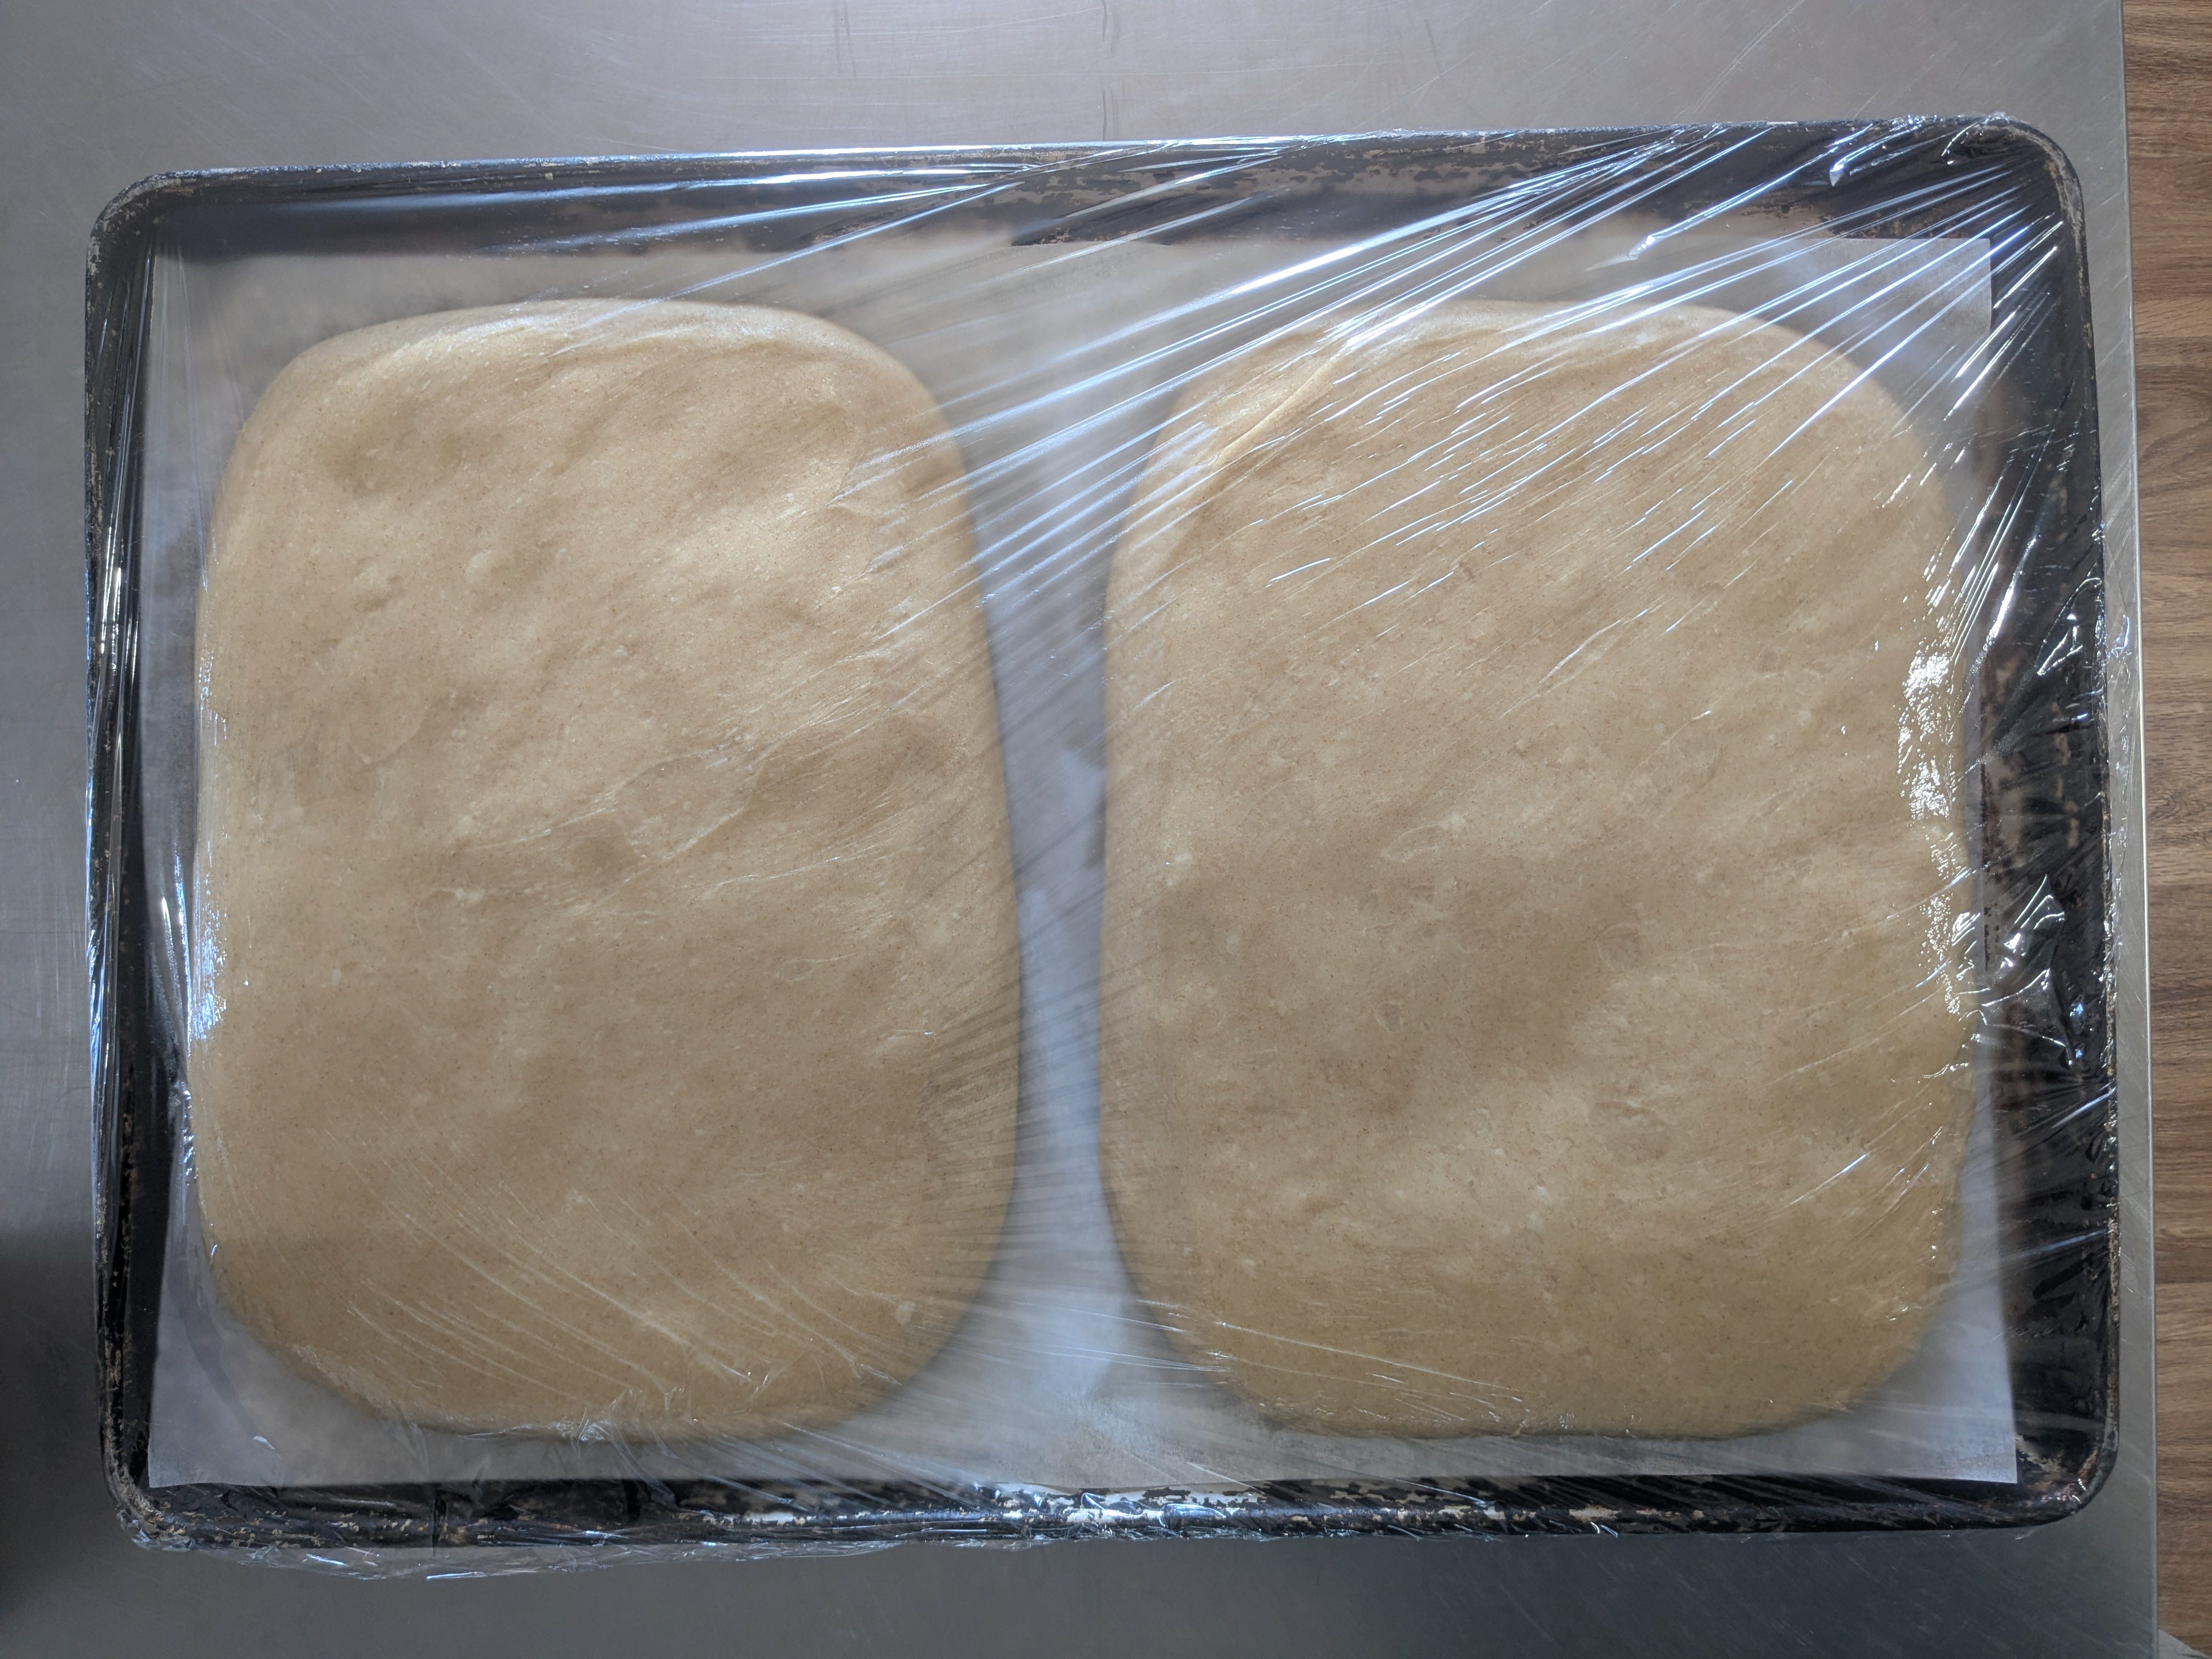
After the dough has rested, use your hands and a rolling pin to shape it into a rough rectangle. Place the rectangle onto a parchment lined sheet pan, wrap it in plastic or cover it with a damp towel, and leave it to rest overnight in your refrigerator.
Day 3: Shaping (and maybe even baking, if you are in a great big hurry) (active time: 30 minutes)
-
Today you will be chopping up and shaping your dough into buns. To prepare for this, add the softened butter and cardamom sugar you have set aside for the Cardamom Schmear recipe to your mixing bowl. Mix these together using the paddle attachment, and at a medium speed, until the butter/cardamom sugar becomes light and fluffy. Add this to a piping bag and set aside. Set aside 40 grams of cardamom sugar for sprinkling onto the dough in the next step.
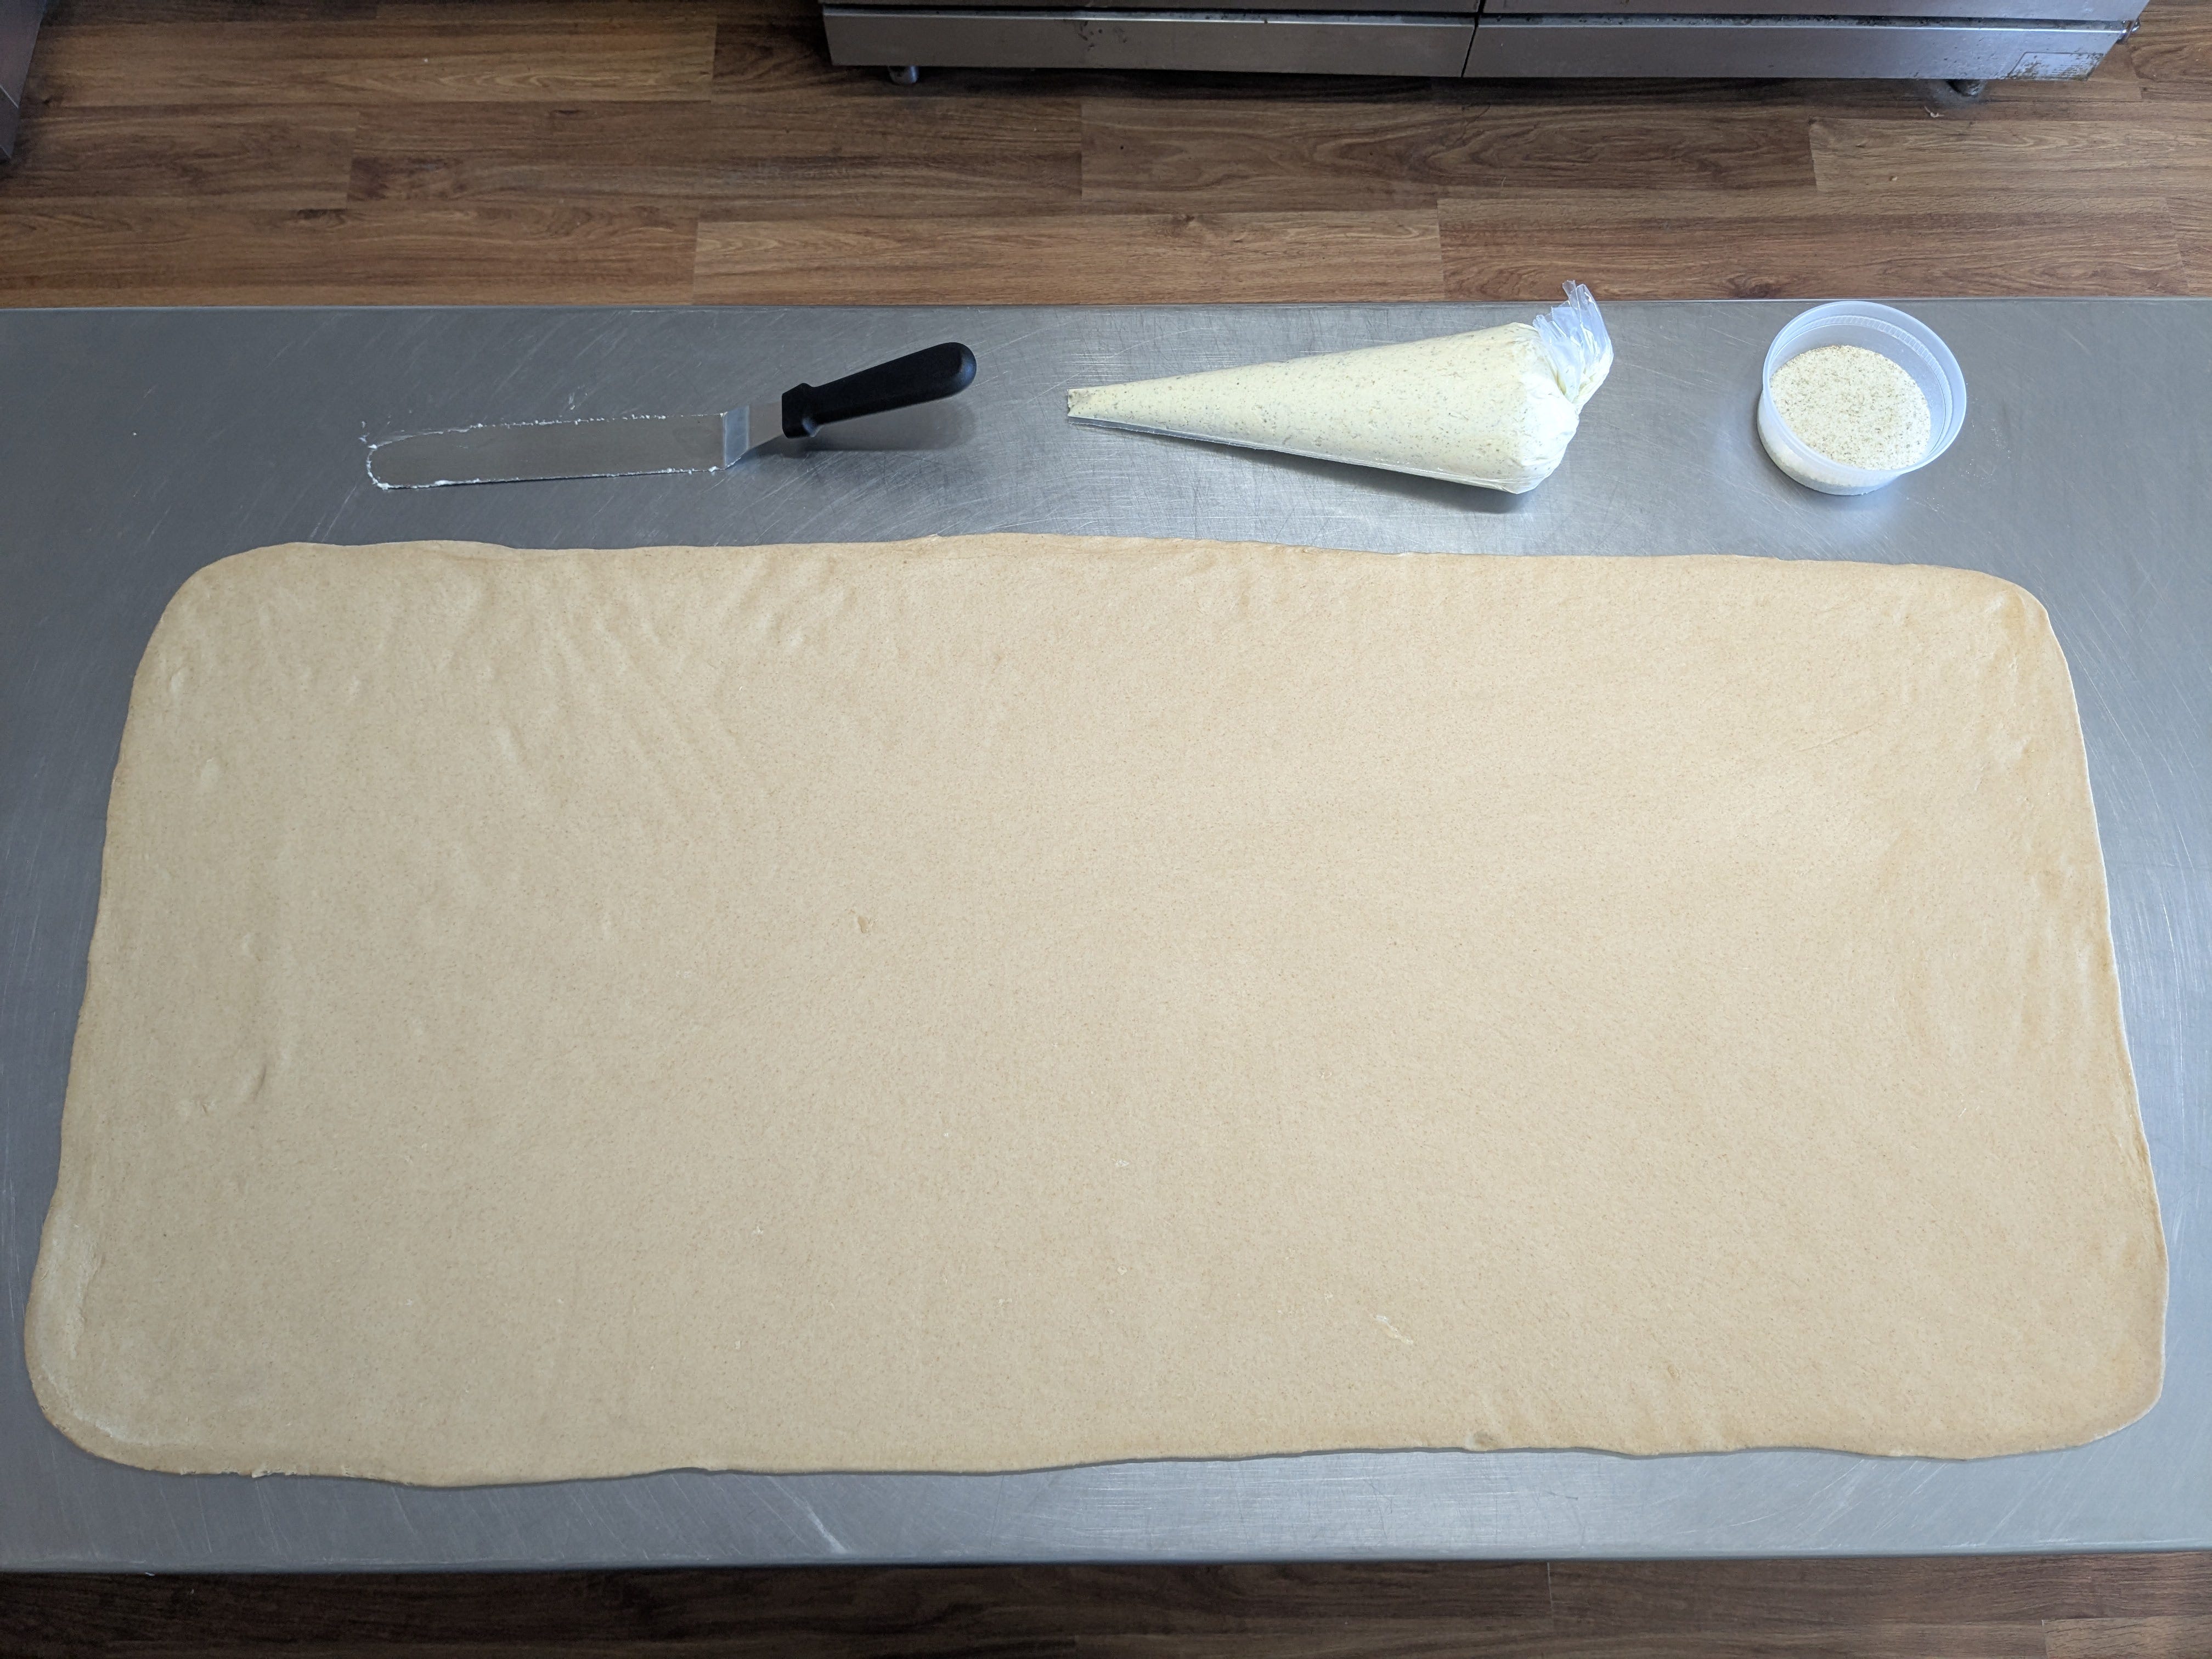
-
Remove the dough from your refrigerator and roll it out onto your work surface using a rolling pin. Try to get the dough roughly 19” across left to right, and 16” top to bottom. Time is of the essence here. The dough will begin to warm up quickly as its larger surface area is exposed to the temperature/humidity of your kitchen environment. Pipe the Cardamom Schmear evenly across the surface of your dough and use an offset spatula to spread it out into a more thin and even layer. Finally, sprinkle the 40 grams of Cardamom Sugar onto the bottom half of your dough.
-
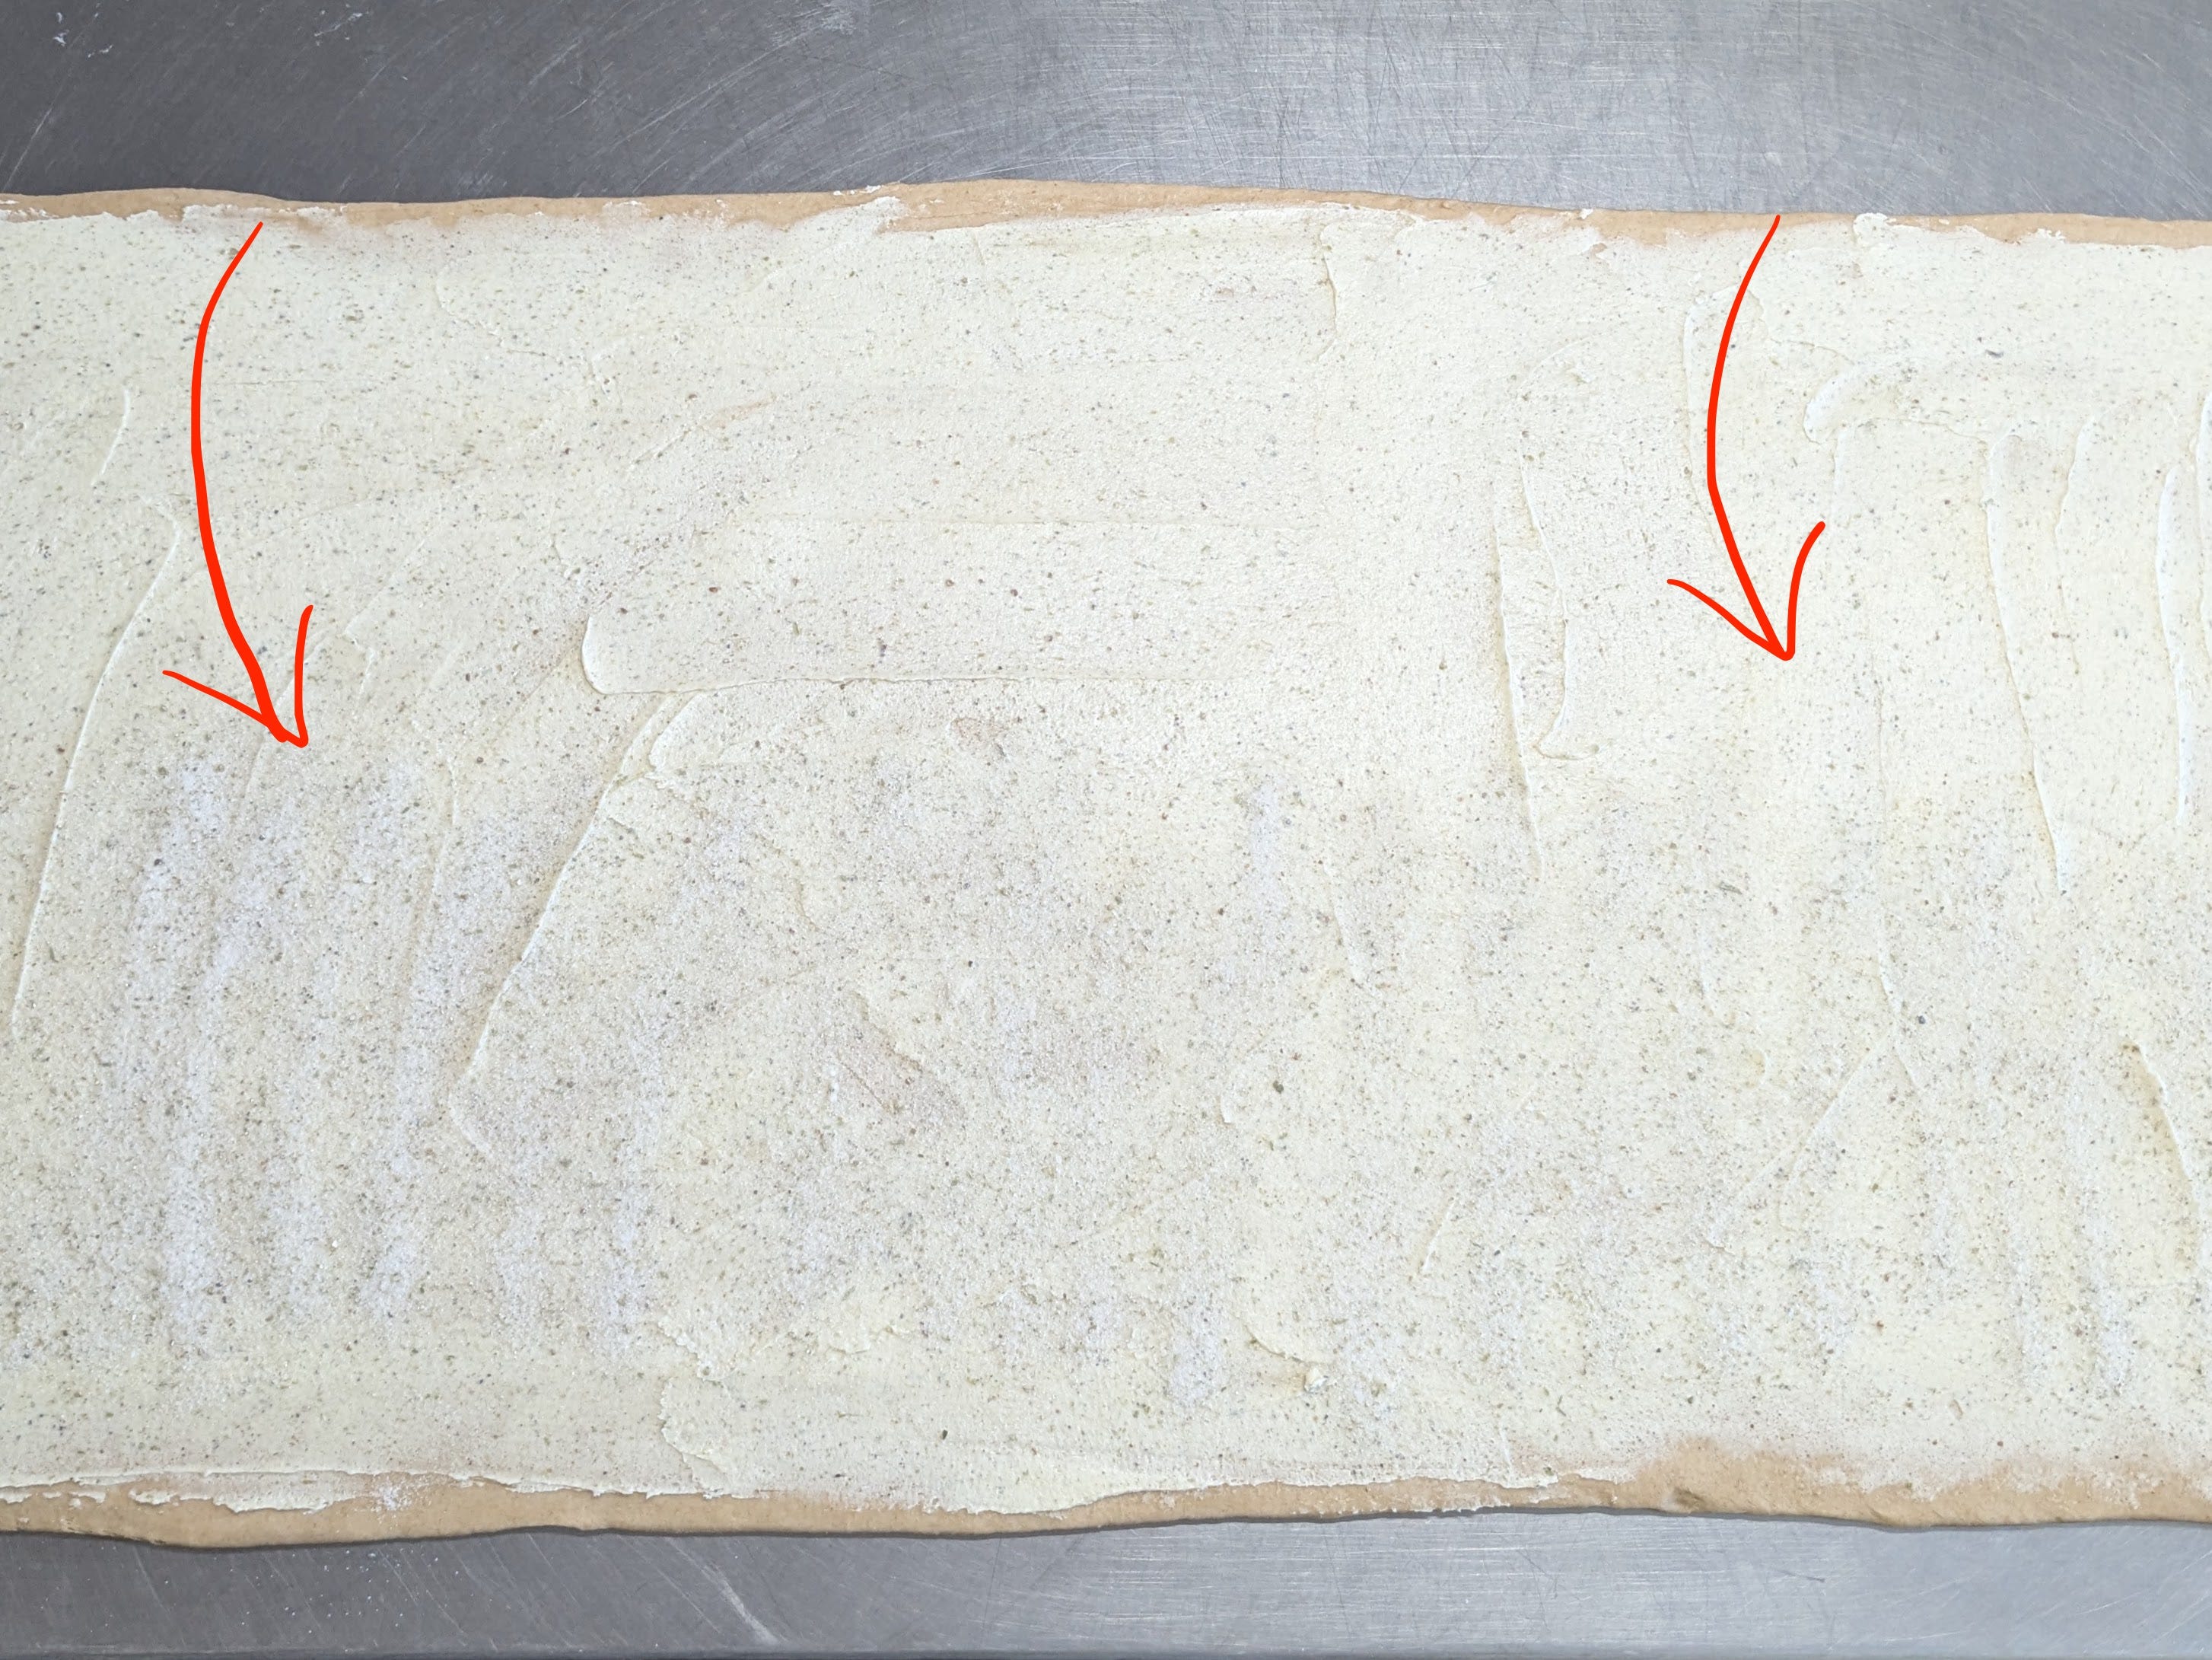
Fold the dough in half, top to bottom, as indicated above. Press down the dough to get a nice seal and to push out any air pockets that may have been trapped.
-
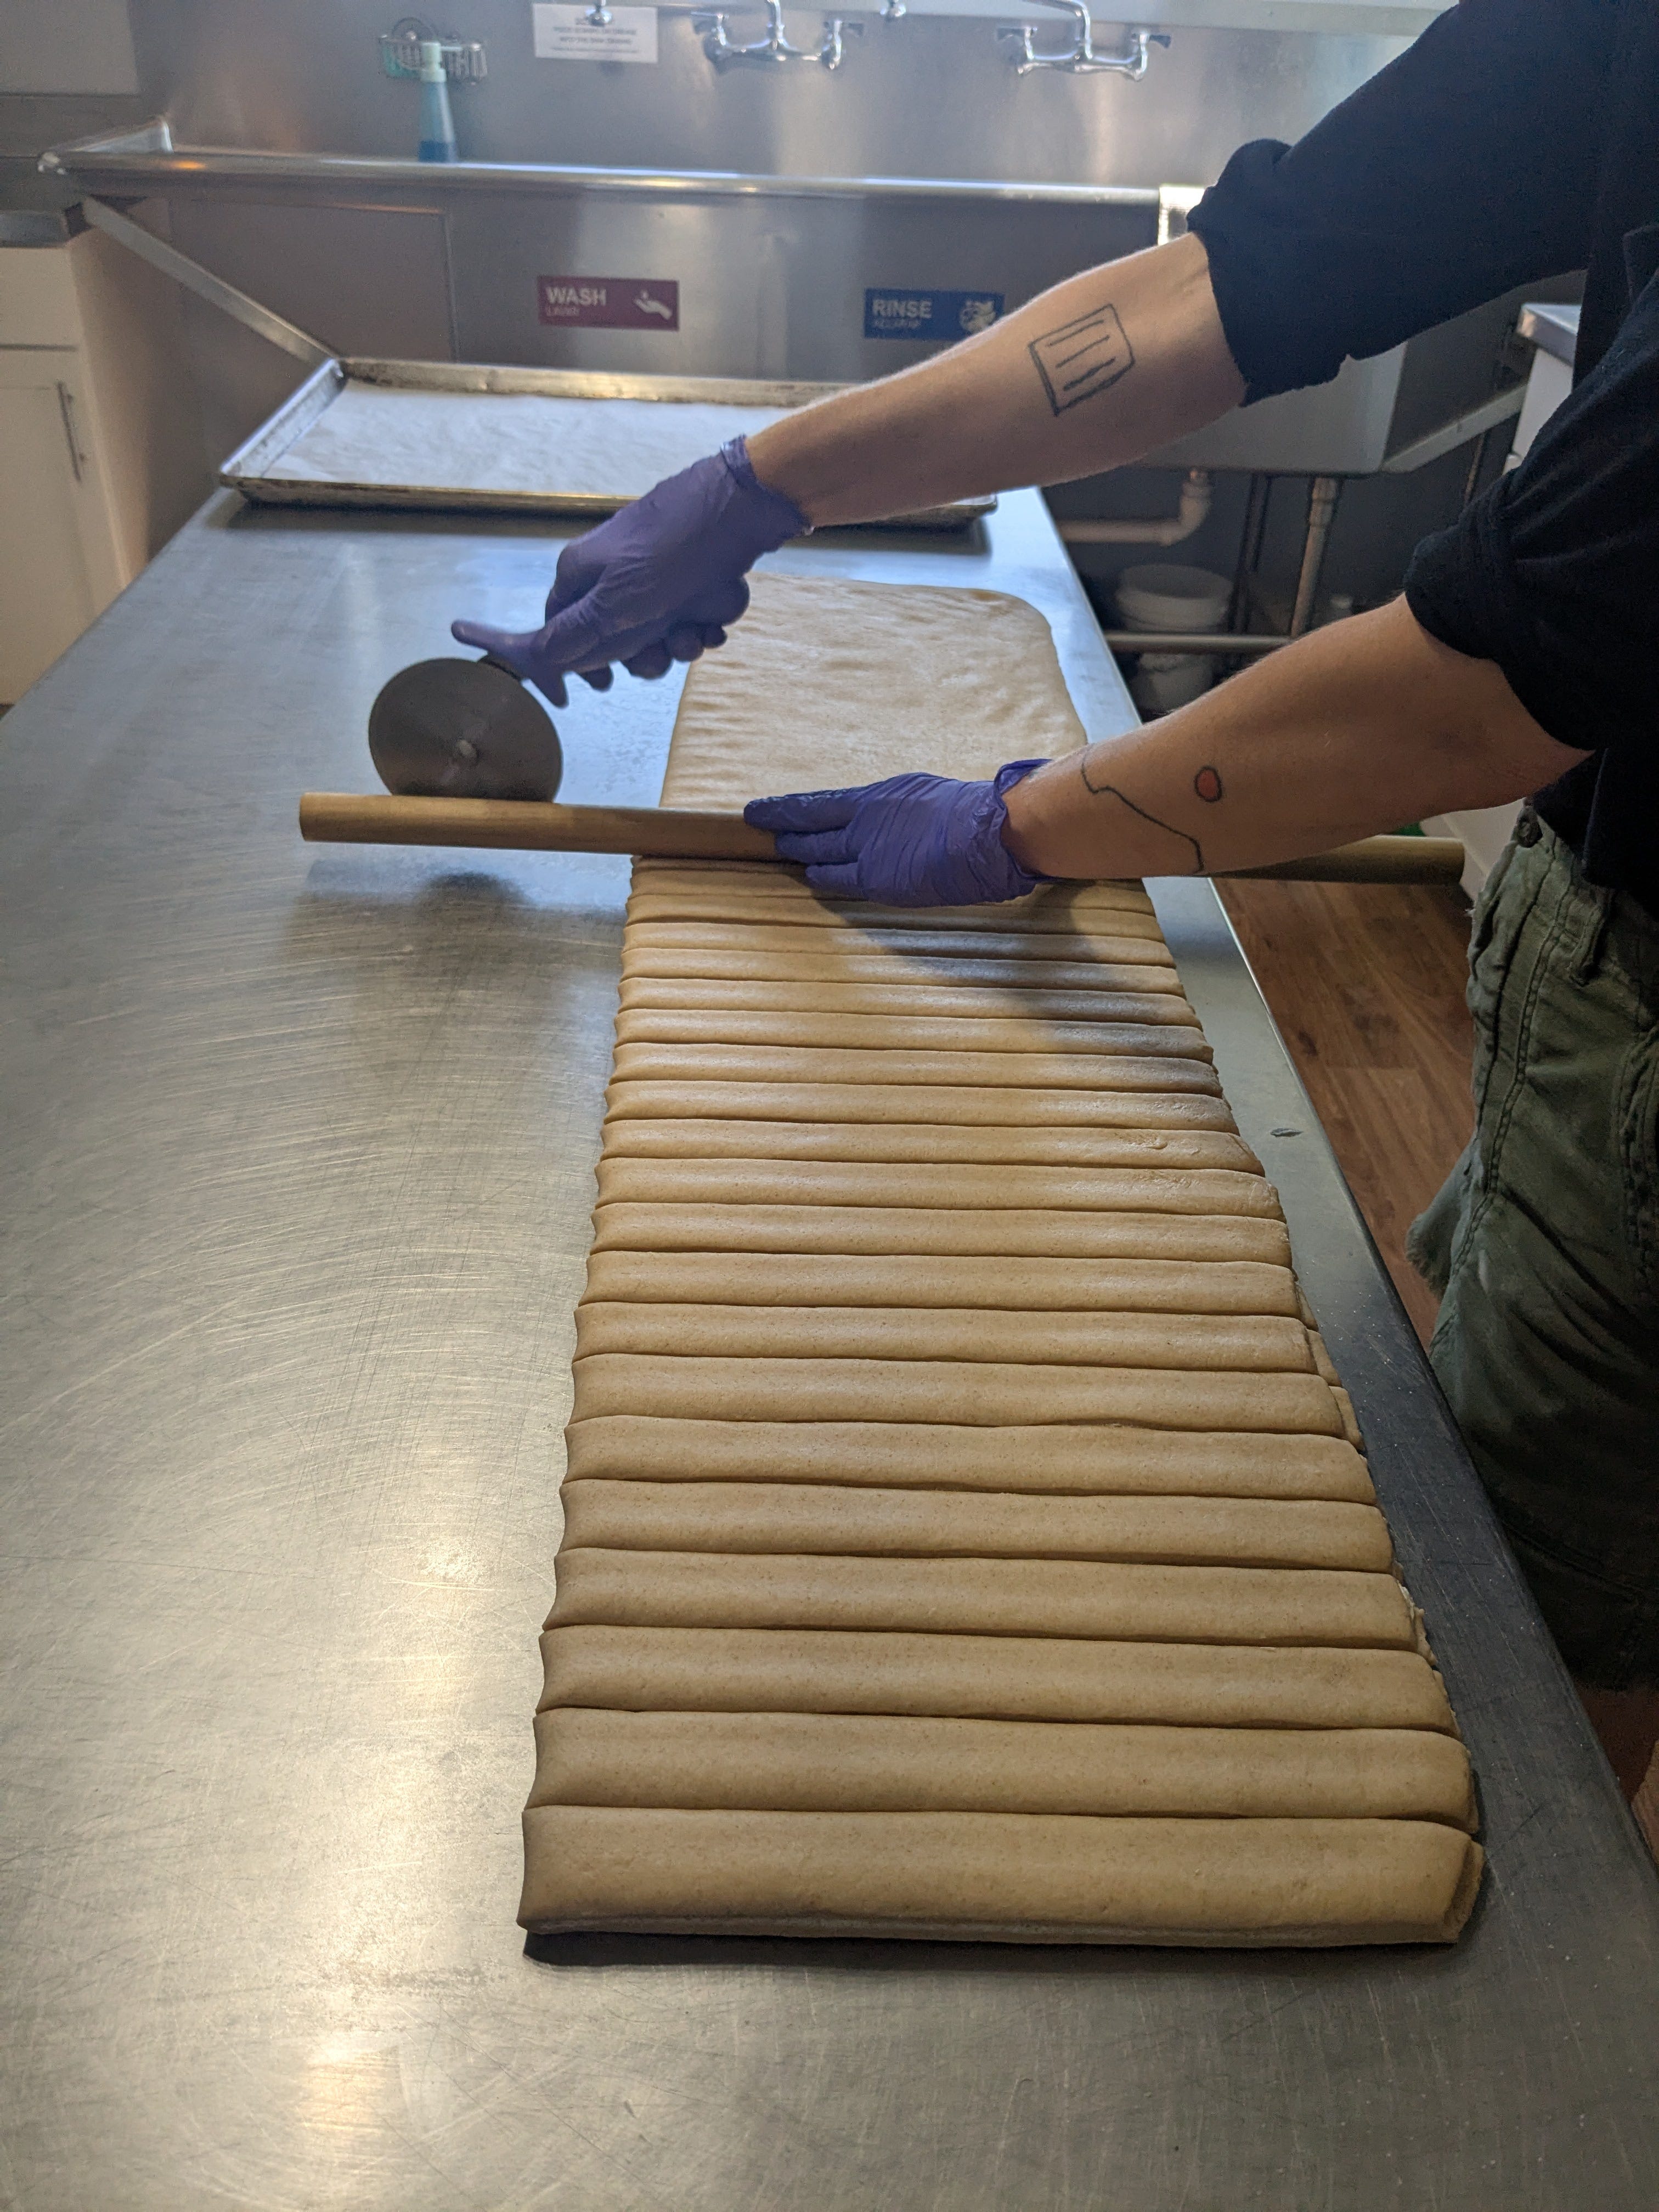
Use a pizza cutter or knife to cut the dough into 1” strips. You should end up with 18 even strips, having just enough excess to cut away and discard the less ideal dough on the ends.


-
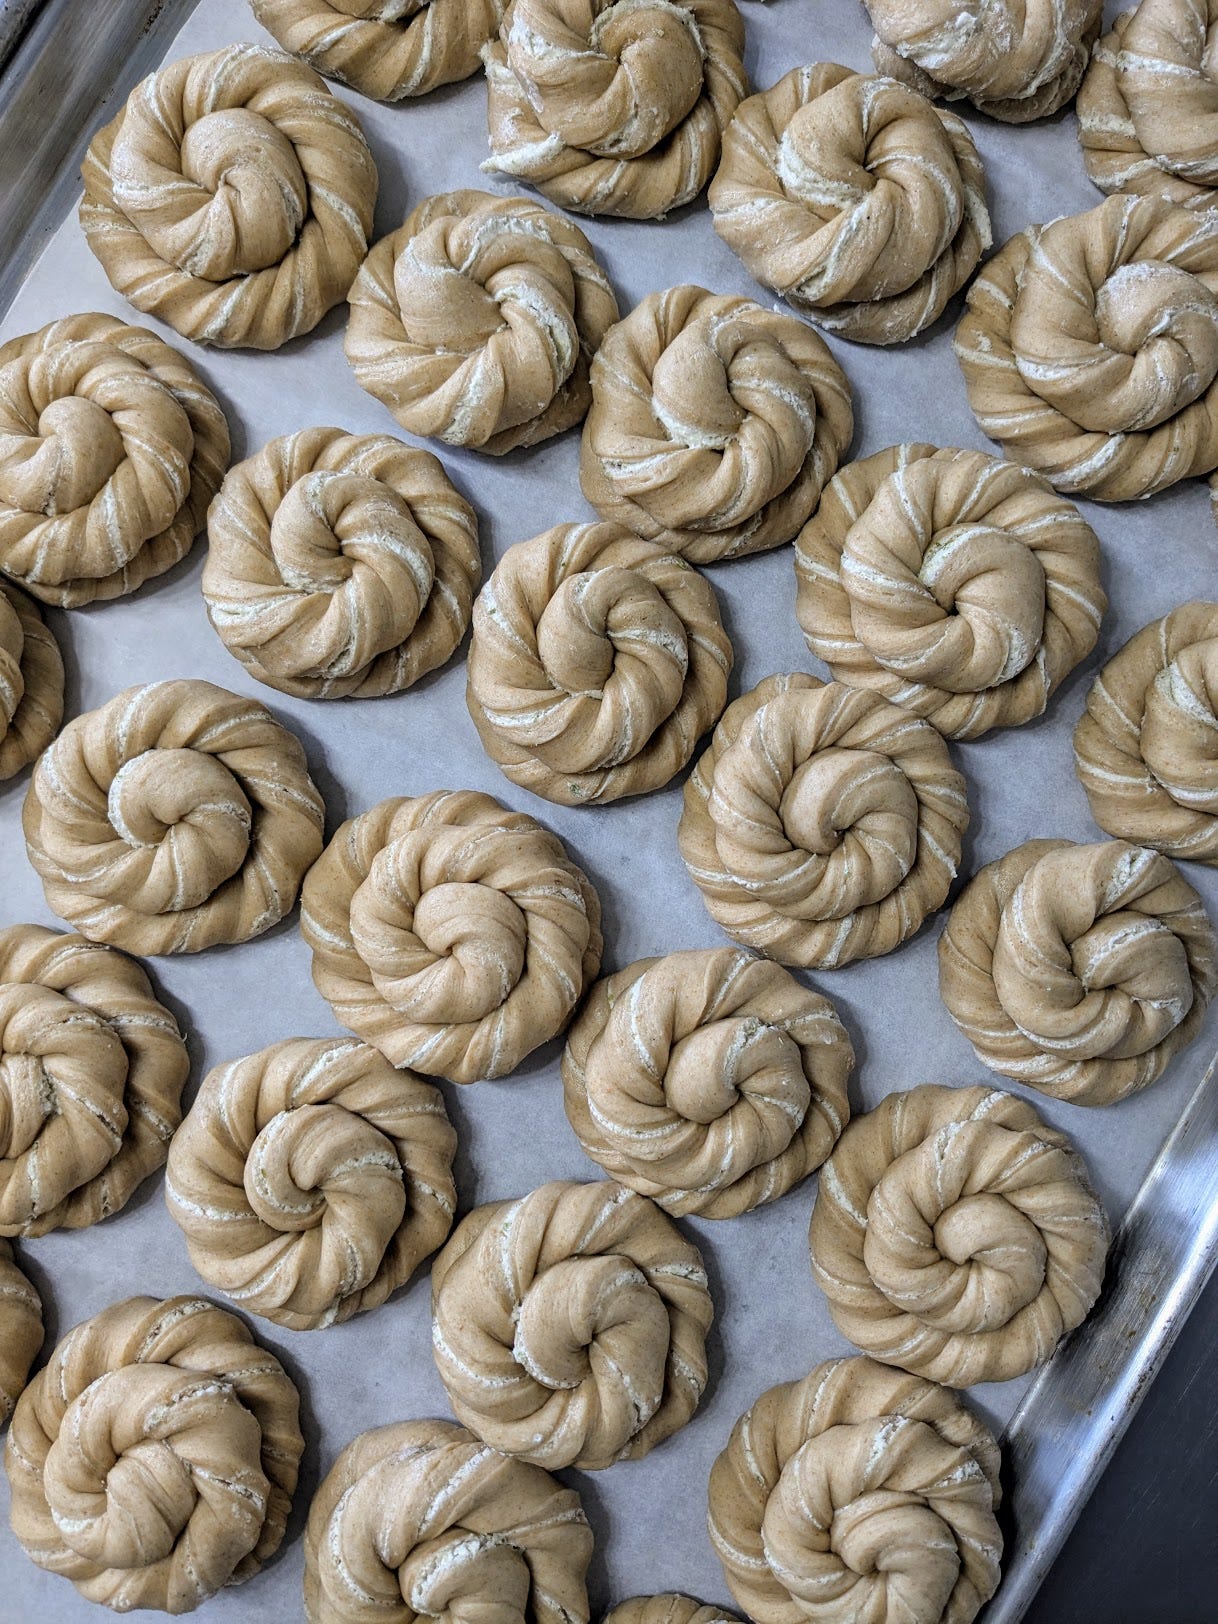
Shape the buns as pictured above, or by any other method that you can find online. To shape as pictured, begin by slightly stretching out a strip of dough and laying it on the work surface horizontally. Using your hands, twist the dough against the work surface. Roll the dough under your right hand away from your body, and your left hand towards your body. Twist until there is a very slight amount of resistance in the dough. Next, arrange the dough vertically with the side of the strip that was in your right hand at the top. Lift up and hold the top end of the dough with your left hand. Using your free right hand, wrap the dough around itself counter-clockwise, ending by squeezing one end of the strip to the other. End by flipping the bun over and placing it onto a prepared sheet pan that has been lined with parchment paper. Gently press the bun down to ensure that the ends underneath have been sealed together.
-
Arrange your buns onto a sheet pan. Wrap and store them in your refrigerator overnight. This extra resting time will allow the pre-ferment that is in the dough to develop the bun’s iconic and tangy flavor.
Deviations: If you don’t have any more time to wait and need your buns now! Feel free to move right along to the Day 4: Proofing and Baking instructions. The buns will not taste the same, but we think you’ll forgive yourself the transgression the moment you eat one.
Day 4: Proofing and Baking (active time: 3.5 hrs.)
-
Remove the cardamom buns from the refrigerator and arrange them on parchment lined baking sheets. 6 buns to a pan if you are using half-sheets (13” x 18”) If you don’t want to bake them all today that’s just fine! They will continue to develop more flavor in the refrigerator over the next few days. Whisk together a couple of eggs and apply eggwash to the cardamom buns using a brush.
-
Allow the buns to proof for ~3 hours at room temperature. We can’t know what the temperature of your kitchen will be, so look for the buns to have increased in size by ~50%-75%. If your oven has a proof setting, this may only take an hour - an hour and a half.
-
Once the buns have proofed, bake them at 350F for a total of ~28 minutes, rotating the pans about halfway through the bake. Look for the color to be a nice golden brown, rather than trusting that the bake time we have provided will be correct. Not all ovens are the same! Depending on your oven situation, you might need to bake your buns in rounds, but fear not, the buns that go in last should survive the extra proofing time, and perhaps benefit from it.
-
While the buns are baking, prepare your cardamom syrup in a small saucepan on the stovetop. Refer to the Cardamom Syrup recipe for measurements. Add the Cardamom Sugar and water to the saucepan. Over medium-high heat, stir until the sugar dissolves and a smooth syrup comes together.
-
With the buns hot out of the oven, use a brush to apply a generous layer of the syrup to each bun.
-
Let the buns cool to an edible temperature and enjoy!

The cardamom buns from our test bake!
Posted on August 12 2025