

Three Layer Chocolate Cake, by Bekah the Edgewood Baker
For Valentine's Day, we asked Bekah, The Edgewood Baker, to create a recipe for us. I promise you this is divine and, as Bekah says, you can change it up or down to suit the mood. Chocolate, chocolate, and more chocolate, PLUS meringue AND poached pears. Delicious.
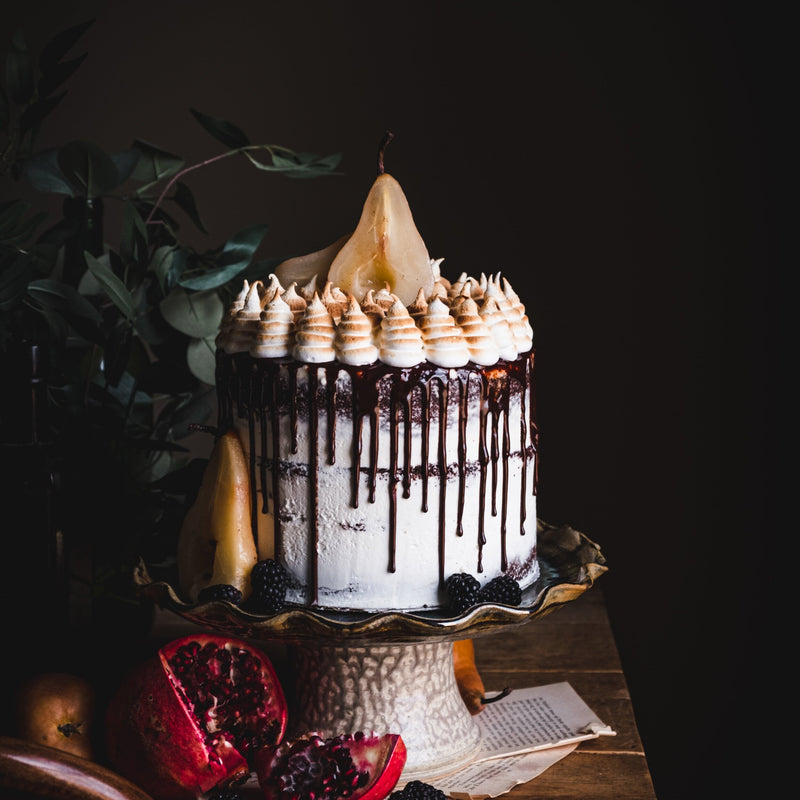
THREE LAYER CHOCOLATE CAKE WITH DARK CHOCOLATE GANACHE, TORCHED MERINGUE AND POACHED PEARS
While this delectable name may lead you to think this is a difficult recipe to make, it’s actually quite simple. Stripped down of all the toppings, this chocolate cake is moist and delicious by itself. Feel free to switch up the toppings with your favorite buttercream, cream cheese frosting, or alternate garnishes.
Ingredients
For the cake layers:
- · 2 cups Janie’s Mill Silky Smooth Pastry Flour
- · 1 cup Janie’s Mill All-Purpose Flour
- · 3 cups granulated white sugar
- · 1 ½ cups unsweetened cocoa powder (I use Callebaut Natural Cocoa Powder.)
- · 1 tbsp baking soda
- · 1 ½ tsp baking powder
- · 1 ½ tsp salt
- · 4 large eggs
- · 1 cup sour cream
- · ½ cup buttermilk
- · ½ cup vegetable oil
- · 1 cup coffee (lukewarm to room temp, not hot)
- · 1 cup room temp water
- · 1 batch of your favorite buttercream or cream cheese frosting
For the dark chocolate ganache:
- · ½ cup dark chocolate or milk chocolate (I used Hershey’s Special Dark Chocolate Chips.)
- · ½ cup heavy whipping cream

For the torched meringue:
- · 2 large egg whites (about 70 g)
- · dash of salt
- · 140 g white granulated sugar
- · 30ml water
For the poached pears:
- · 3 pears peeled (I prefer Bartlett for their shape and texture, but any will work.)
- · 2 cups white wine
- · ¼ cup white granulated sugar
- · 2 tbsp honey
- · 1 tsp cinnamon
- · ½ tsp nutmeg

Instructions
To make the cake layers:
1. Prepare 3 - 8” cake pans by spraying with nonstick cooking spray and lining the bottoms with parchment paper. (I use half sheets of parchment paper and outline the cake pan with a pencil. I then cut out with scissors.) Preheat the oven to 350 degrees.
2. Add all the dry ingredients to the mixing bowl of a standing mixer fitted with the paddle attachment (can also whisk by hand if preferred). Mix the dry ingredients until they are uniform in color – 1-2 minutes. Add all wet ingredients and mix just until combined, scraping the bowl down once or twice to ensure any flour pockets are absorbed. Do not overmix.
3. Pour the batter evenly between the three cake pans. Bake on the middle rack for 25-30 minutes or just until the center comes out nearly clean. (Note that chocolate cake can be overbaked very quickly. I say “nearly clean” because the cake will continue to bake for another minute or two out of the oven so a small streak of batter when testing doneness will likely be baked off out of the oven.)
4. Let cakes cool for 10-20 minutes in the pans. Flip out each layer and let cool completely – another 30-40 minutes. Once cool, wrap each layer in cling film and refrigerate for 2-3 hours or overnight. They can also be frozen for several days until ready to use. Refrigerated or frozen cake layers are much easier to decorate than room temperature cakes.
5. When ready to decorate, prepare your buttercream first if making from scratch. I use this vanilla buttercream recipe by Sugar & Sparrow as my go-to buttercream base. Alternatively, a cream cheese frosting or store bought frosting works as well.
6. Utilizing a cake stand and cake board or plate, place a small dollop of frosting in the center of the plate, then unwrap and center your first cake layer. Frost a generous layer on the top of the cake and repeat with the remaining cake layers. Finally frost the top of the cake and work your way down the sides until the whole cake is frosted. Using a bench scraper, smooth the sides and top of the cake until the sides of the cake layers just start to slightly show through (this is called a naked cake). Chill in the fridge for 15-20 minutes.
To make the ganache:
1. Add the dark chocolate to a small bowl. Set aside. Add the heavy cream to a saucepan and heat until quite warm but not scalding. Look for small bubbles around the edges of the saucepan.
2. Pour the cream over the chocolate and let rest for 30 sec-1 minute.
3. Then mix until the chocolate is melted, and the ganache is smooth. Set aside for 10-20 minutes to let the ganache thicken to drip consistency.
4. Once at the desired consistency, pour a large portion of the ganache onto the center of the cake. Using a spoon, you will start to spread the ganache out until it starts to drip down the sides of the cake. You can utilize any remaining ganache to create extra drips where you see necessary.
5. Chill again for 15-20 minutes.
To make the meringue:
1. Add the eggs whites and salt to the bowl of a stand mixer fitted with the whisk attachment. Begin whisking on low to medium.
2. Add the sugar and water to small saucepan. Head over medium high heat until mixture starts to create foamy bubbles, and the temperature reaches between 210-220 degrees.
3. Turn the mixer up to medium and slowly pour in the sugar mixture in a steady stream. Once the mixture is all added, turn the mixer on high and let it whisk for 10-12 minutes or until the meringue is glossy and has formed stiff peaks.
4. Add the meringue to a piping bag fitted with a large round or star tip. (I typically use Ateco tips 808 or 827.) Starting in the center, pipe large dollops on the top of the cake. I like to create ridges in my dollops as well for extra texture.
5. Using a culinary blow torch, torch the meringue until the edges are light to dark brown in color. Chill again in the fridge.
To make the poached pears:
1. Add all ingredients to a medium saucepan except pears. Whisk together and heat until sugar has dissolved.
2. Add pears and cover saucepan with a lid. Let simmer at medium heat for 15-20 minutes until pears are soft (but not mushy), turning the pears a couple times to evenly cook all sides.
3. Remove pears using a slotted spoon and let rest on a plate or cutting board lined with paper towel to soak up excess juices.
4. If desired, continue simmering liquid until it reaches a syrup-like consistency. You can then keep this as a topping for ice cream, oatmeal, etc...
5. Once the pears are cool, slice in half and remove the cores with a fruit corer or small spoon.
6. Delicately place on the top of the cake or around the sides as desired.
Please note that this cake is best eaten at room temperature. Remove from fridge for at least 1-2 hours prior to serving. Enjoy!
Notes
- · There is a lot of chilling involved in this recipe as is typical for many layered cakes. To save on time, I often will make the cake layers and poach the pears the day ahead of decorating. This gives the cake layers a chance to chill and allows the pears to cool completely. Buttercream made from scratch can also be kept in the fridge for several days and simply mixed for a few minutes prior to using.
- · I love the combination of pastry flour and all purpose flour in this recipe. Pastry flour is used because it has a lower protein percentage than all purpose flour, contributing to a more tender crumb. The all purpose flour gives the crumb a boost in structure to withold being stacked and decorated.
- · Short on sour cream? You can usually substitute yogurt for sour cream with no problems.
- · The coffee in this recipe helps to enhance the chocolate flavor. If you prefer no coffee at all, feel free to simply substitute water.
- · Short on time? Bake this recipe in a bundt cake tin and simply top with chocolate ganache. Make sure to thoroughly spray the tin before adding the batter and only fill about ¾ full. Allow to cool completely before flipping out. The bake time will be longer as well. You will likely have a little batter leftover which can be baked in a small cake or loaf pan.
Bekah Stamps is a micro-baker, food photographer, stylist and blogger living in the St. Louis area. She currently runs a cottage kitchen out of her home making naturally leavened sourdough breads and rustic pastries for local coffee shops, farmer’s markets and private clients.
In addition to baking, Bekah is an avid creative with a love for styling and photographing the food she makes. She regularly creates content for her social media pages and blog and has also partnered with brands and magazines on sponsored content and recipe development. Her work has been featured in Thrive magazine, and she has a growing Instagram community.
Bekah Stamps
Contact: info@theedgewoodbaker.com
Blog: theedgewoodbaker.com
Instagram/FB: @theedgewoodbaker
Posted on January 29 2021