

Whole Wheat Croissants, by Natalya Syanova (Natasha's Baking)
This recipe for super-flavorful croissants is from Natalya Syanova, creator of the award-winning blog Natasha's Baking and author of Soughdough Baking with Kids.
Natalya's Notes
As you know I love experimenting with ingredients. But when it comes to croissants, I was scared to even think of using whole wheat flour, considering the fact that it acts absolutely different compared to regular flour, as it's heavier, thirstier, and less stretchy. But I was committed to try, and ready to start!
Flour selection played a very important role in my research. To achieve results you want, you have to use flour that is suitable for whole wheat croissants--stone ground, finely milled, and sifted. The brand I trust is Janie's Mill because their flours always help me achieve the best results and exceed all of my expectations.
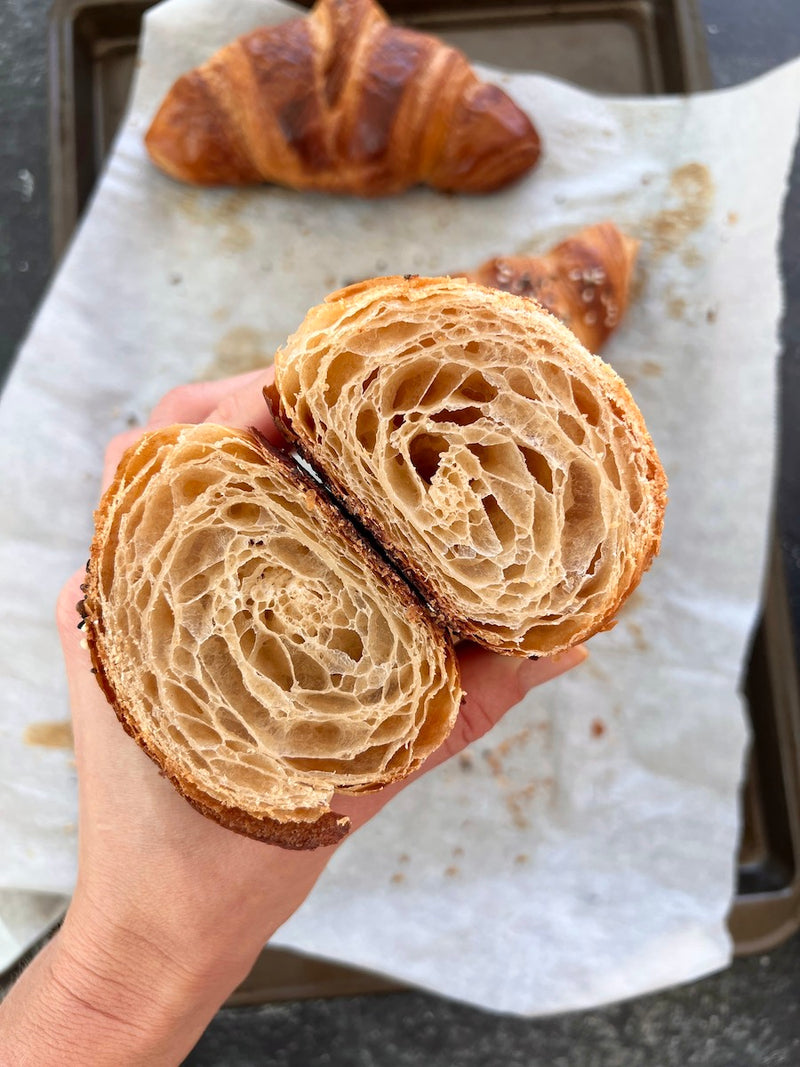
For this whole wheat croissant experiment, I had to test out a few things. Now I am very happy to share my findings and results with you, as these croissants came out very light, with a beautiful color, and unbelievable flavor.
Yield: 12 croissants
Natalya's Note: If you've never made croissants before, I suggest you start with a smaller batch (1/2 recipe), as less dough is so much easier to roll out, laminate, and work with.

Ingredients
Main Dough (for 12 croissants)
- 500g Janie's Mill Organic Sifted Artisan Bread Flour -- Natalya's Note: If you are looking for deeper flavor, substitute 50g Janie's Mill Turkey Red Flour and 50g Janie's Mill Organic Black Emmer Flour for 100g of the Sifted Artisan Bread Flour
- 235g lukewarm milk (47%)
- 85g lukewarm water (17%)
- 55g sugar (11%)
- 25g soft butter for the dough (5%)
- 10g salt (2%)
- 5g dry instant yeast (1%)
- 300g rolling butter (60%) for lamination -- Natalya's Note: If possible, use the good quality European butter with fat content of 82% or more.
Equipment
- Large mixing bowl
-
Parchment paper
- Rolling pin
- Baking pan
Instructions
Night before:
- Add lukewarm milk and water to a bowl
- Dissolve yeast in the liquid mixture, then add sugar, salt, all the flour, and butter (for the dough). Mix by hand, or on a slow speed of your mixing machine. Dough can remain a little lumpy. There's no need to develop gluten as it will develop by itself overnight.
- Cover with plastic wrap and refrigerate until the next morning.
Next day:
- Prepare butter for rolling. Butter has to be pliable, but not too soft (about 16-18C / 60-64F). Use parchment paper to roll the butter into a block about 20cm/ 7.8 inches on each side. Put in the fridge to chill for 5 minutes before rolling.
Natalya's Note: The butter shouldn't be too cold or too warm. If it's too cold, it will start to break into pieces during lamination. if it's too warm, it will melt in between the layers.
- Remove the dough from the fridge. Roll it out in a rectangle that's big enough to place the butter block inside. (About 20cm x 40cm / 7.8 inches x 15.8 inches) For more detailed lamination instructions and step-by-step photos, see Natalya's Baking Blog.
- Place butter block on the dough and fold the dough so the butter block is encased.
- Seal the edges so the butter stays inside as you roll it out.
- Start rolling by pushing the butter from 1 side to the other, lengthwise.
- Trim the edges and place on top of the dough. It will release the tension during rolling.
- Fold the dough in half, as if it were a book.
- Turn the dough 90 degrees, and continue rolling lengthwise. Cut the edges, put them aside, and fold the dough as you would a letter. (See photo below.)

Natalya's Note: Work fast, and try not to touch the dough too much, to avoid overheating.
- Cover the dough and transfer it to the fridge for 1 hour.
- Remove the dough from the fridge.
- Roll it out into a rectangle with the short side about 26-28 cm / 10-11 inches.
- Continue rolling until the dough is 5mm /0.1 inch thick.
- Trim all uneven edges.

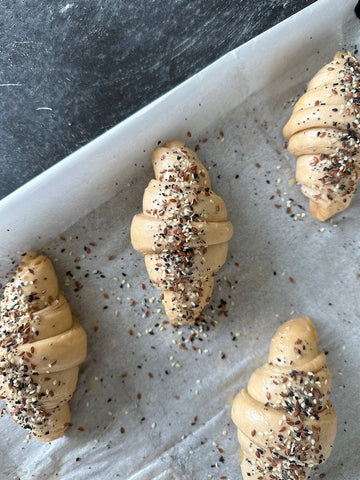
- Cut the dough into triangles, as in the photo above (the base of croissant has to be 8cm).
- Shape croissants and cover.
Natalya's Note: At this point you can cover the shaped croissants and transfer them to refrigerator until 9-10pm. Then you can take them out and let them proof overnight at room temperature, 68-72C/20-22C. This way you'll be able to bake fresh croissants for breakfast.
Or
- Let shaped, covered croissants proof for about 4-5 hours at 74-78C / 24-26C until they double in volume and become jiggly.
- Make an egg-wash (mix one egg with 2 tbs of water), and brush the croissants with the egg mixture.
- Preheat the oven to 375F.
- Bake croissants for about 20-25 minutes, or until golden brown.
Enjoy!

Posted on December 07 2022